Monday, February 15, 2010

Chewy Chocolate Drop Cookies


Well, Happy New Year, everybody! Sure, it's only a month and a half late, and three and a half months since my last blog post, but who's counting?

Where have I been? I started a new job about six months ago (has it been that long? Holy crap.) in which I am mistress of all things web ("strategic messaging and brand conformity" to be specific). The initial focus of my job was make sure a new website was launched and ensure over 30,000 web pages were converted to the new look. If not readily apparent, this is a HUGE task but, fortunately, I am not alone - there is a special-ops CIT team bringing their time, talent and patience in dealing with me to get the mission accomplished.

I have promised two members of the team (coincidentally named "Laura" and "Laurie") that if their portion of the job is finished by April, they receive a cake of their choosing. (I think I floated the opera cake at one point, which illustrates just how desperate I was/am to finish this project.) "The Lauras," as we are sometimes collectively referred, accepted and now we are eyeing one another carefully, hungry for what the other has promised. (I'm not sure if the other members of the CIT team are aware of this deal but if they find out, I will happily enter a similar bargain with them.)

In any event, all of this web work -- staring at web pages, reorganizing architecture, planning URLs, discovering bugs, tweeting, facebooking, etc. etc. -- has driven me from updating this blog. Because at the end of the day, the last thing I want to do use a rich text editor to upload another g.d. picture to the Internet.

Cooking has fallen to the wayside too. We have eaten many quick-fix meals over the past several months, things that take 20 minutes, max, to make.

But, I love cooking. And blogging has always been pretty great, too -- particularly the interaction between readers and other bloggers.

So, I think I'm back. It won't be exactly like before: though I've always had an emphasis on simple recipes with delicious results, I'll likely be looking for recipes that are that much simpler -- but I'm not wandering into Sandra Lee territory, either.

The other shift will be a greater emphasis on vegetarian cooking. Shane has decided to become a fish-etarian, meaning he's avoiding all meat except seafood. That's been another challenge for me, as I've always viewed a good Sunday dinner being centered around a roast chicken, meat lasagna, or pork tenderloin. So, we'll see what happens there.

As always, if you have recipe ideas, suggestions or questions, send them my way via LauraRebeccasKitchen@gmail.com . And if you've read this far, you deserve a cookie; here's a recipe. :)


Chewy Chocolate Drop Cookies
(adapted from Laura's Best Recipes)

2 cups + 2 tbsp all-purpose flour
1/2 tsp baking soda
1/2 teaspoon salt
1 1/2 sticks of unsalted, melted butter -- cooled
1 1/2 cups packed golden brown sugar
1 large egg
1 large egg yolk
2 tsp vanilla extract
1 cup chocolate drops (like M&Ms)

Place oven rack in the middle of the oven. Preheat oven to 325.

In a microwave-safe bowl, melt the butter in the microwave, then set aside and allow to cool.

Line a baking sheet with parchment paper.

Combine flour, baking soda and salt in a bowl.

In a large mixing bowl, beat the melted (and cooled) butter and sugars together with a mixer on medium speed for about 2 minutes. Beat in the egg, yolk and vanilla and beat until the blend starts to lighten in color and looks like it's beginning to whip; scrape down the sides of the bowl as needed.

Place mixer on the lowest speed and very slowly add the flour mixture a little bit at a time. Don't over mix; mix until the flour is just blended into the wet ingredients. Add the chocolate drops and stir with a spoon until well-incorporated. (Beating the chocolate into the dough with the mixer will break the chocolate drops.)

Chill the dough in the refrigerator for 10 minutes.

Take approximately 2 tablespoons of dough at a time and roll the dough into well-formed balls. For flatter cookies, flatten the dough gently; for puffier cookies, leave the dough in balls. Place the dough on the baking sheets about 2 inches apart. Bake the cookies for 6 minutes, rotate the cookie sheet, and bake another 7- 10 minutes. The cookies' edges should just barely begin to brown. The center will look puffy and/or slightly set.

Remove the baking sheet and let the cookies cool for 10 minutes. Transfer to a wire rack to allow the cookies to completely cool. Store in an air-tight container.

Monday, October 26, 2009

2009 Slice, Dice + Spice NY Champs!

So, when are we all taking a trip to Chef Kate Elliot's restaurant, Juniper. ?

Sunday, September 27, 2009

Are you there blog? It's me, Laura. I have Raspberry Scones.


You know how some food bloggers parlay their work into cookbooks? Or become food writers or food photographers. Or pursue a full-time career in the culinary arts.

Not me. This little blog, which I have woefully neglected lately, has not gotten me a food-related job.

But it has helped me get a web-related job.

Three weeks ago, I joined SUNY Geneseo at its Web Communications Manager. (Check us out on the TODAY show!) I'm work in the College Communications department, and I'm in charge of the College's strategic communication and brand conformity across the web, which includes our website (re-launch to come soon) and social media.

It is a *big* job -- transitioning a website with 30,000+ pages is daunting -- but I don't think I've ever gotten a warmer welcome or more support at work than from my new employers. It's a challenge but it's a very good one. (And the salary increase doesn't hurt, either.)

But back to the topic at hand: all that time spent writing about and photographing food, updating on facebook, tweeting on twitter, etc. etc. -- it all helped me land my new job. I don't think I would have gotten an offer without my time spent here.

It's so strange, isn't it? When you do something as a hobby, you just see it as that: something pleasant to do to pass the time. But you never know when your playing will turn into something bigger, and when it does, it's a happy surprise.

---

Our department is housed in a renovated frat house (insert joke here), which means we have a full, working kitchen. (Also, one and a half baths.) So about a week after I started, I brought in some raspberry scones and heated up in the oven before serving. They disappeared quickly.

I don't think there's anything wrong with using baked goods to assist with job-security, do you?


Raspberry Drop Scones (adapted)

1/2 cup milk
1 egg
1 tsp. pure vanilla extract
2 cups flour
2 tsp. baking powder
½ tsp. salt
1/4 cup cold butter, cubed
3 Tbsp. sugar
1 cup frozen raspberries
1 Tbsp. large sugar crystals (or just use more regular sugar)

Preheat oven to 425 degrees F. Line a baking sheet with parchment paper; set aside.

In a small mixing bowl, whisk together the milk, egg, and vanilla; set aside.

In a large bowl, mix together the flour, baking powder and salt. Add in the cubed butter and use a pastry blender or your hands to work the butter into the dry ingredients; the butter should resemble small peas. Add in sugar and raspberries and mix gently.

Using a rubber spatula or a wooden spoon, pour in the milk/egg mixture, reserving about a tablespoon for later. When the dough forms into a ball, knead the mixture a few times with the spatula/spoon and drop large spoonfuls of dough onto the prepared baking sheet.

Brush remaining milk/egg over top each scone and sprinkle with remaining tablespoon of sugar.

Bake for scones for about 15 minutes or until golden. Cool on a rack.

Yields 8 - 12 scones.

Saturday, September 05, 2009

Coconut Macaroons and Confections of a Master Baker


A few weeks ago, Stephanie to participate in The Edible Word for Confections of a (Closet) Master Baker by Gesine Bullock-Prado.

The rules were to "pick a dish that she mentions in the book or an ingredient that she talks about. Find a recipe or create a recipe for that dish, pastry or ingredient, and make it! (or if you like, make one of the yummy recipes she's included in the book)

Post an entry with a picture to your blog and share with us what compelled you to pick that particular dish, and any history about the recipe you created or are using to make that dish."

Bullock-Prado's book is a fun read -- though the publishing company organized some of the recipes and chapters a bit oddly and I am bothered by the author's attitude toward people who aren't thin.

Bullock-Prado is known for her french-style, almond macaroons. It's a recipe and cookie near and dear to her heart, which she writes at length about. Unfortunately, it's so near and dear that she doesn't share her recipe with her readers.

Still all this talk about macaroons had me craving *coconut* macaroons and, fortunately, Bullock-Prado provides a nice recipe for these on her blog.

They come together quickly and easily -- and the result is absolutely delicious. I didn't dip these in melted dark chocolate, but that would be a nice touch!


Coconut Macaroons (adapted)

4 egg whites
3 ½ cups sweetened shredded coconut
¾ cup sugar
1 tsp. vanilla
½ tsp. salt

Preheat oven to 300-degrees F. Line two baking sheets with parchment paper; set aside.

Combine all ingredients into a metal/heatproof bowl and set the bowl on a saucepan of simmering water. Stir occasionally to prevent the bottom from burning.

When the mixture is hot and has thickened slightly (about 10 minutes), use a medium sized cookie scoop, to scoop and drop batter onto the prepared baking sheet. Bake for 15 to 20 minutes, or until the edges are dark golden brown, rotating the pans from front to back and top to bottom half-way through the baking time.

Saturday, August 22, 2009

VOTE! VOTE! VOTE!


Game ON! Vote for my Finger Lakes Fantastic Onion Burger (and four sides) by clicking here, or send an email to Rebecca@VisitFingerLakes.com with "FLX Ultimate Burger Vote: Laura Kenyon" in the subject line.

Thank you for your support and enjoy the recipes!

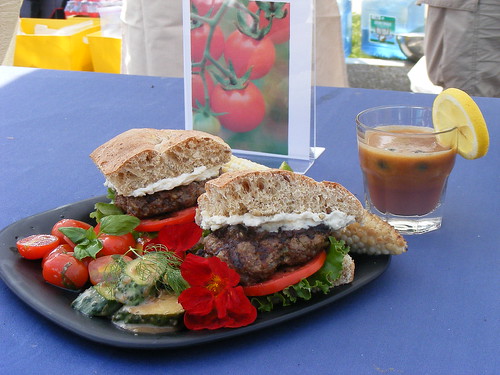
Finger Lakes Fantastic Onion Burger

Olive oil
2- 3 garlic cloves, minced (Mullala Garlic)
1 medium onion, diced ( Jones Brook Produce)
Round wholegrain loaf (Kitchen Blessings)
1 lb ground beef from Bedient farms
Salt and pepper
sliced tomatoes (Seneca Vegetables)
Baby arugula or salad greens (Ambrosia Acres Family Farm)
Franjo farms Onion Garlic Asiago spread
nasturtium flowers for plate garnish, optional (Ambrosia Acres Family Farm)

In a small sauté pan, heat olive oil over medium heat. Add onion and garlic and sauté until translucent; set aside and allow to cool to room temp.

Slice bread into four wedges, then slice horizontally to form buns; set aside.

Mix garlic and onion with ground beef; season with salt and pepper. Form four triangular patties (they should be similar in shape to the buns) about ¼-inch thick. Grill over medium-high heat, flipping once, to desired doneness.

While burgers are cooking, lightly brush the insides of the bun with olive oil, and place face-down on grill to toast.

When burgers are ready, place arugula or salad greens and tomato on bottom half of bun. Top with burger, then top with other half of the bun spread generously with Onion Garlic Asiago spread. Garnish plate with nasturtium, if desired.


Quick Pickles
1 pint of pickling cucumbers (Gale-Wyn Farm)
1 bottle of Roasted Garlic/Red Wine Balsamic Vinaigrette (Chef Lerman)
Sprigs of fresh dill (Firefly Farm)

Wash cucumbers and cut on a diagonal into ¼-inch slices; set aside. Heat vinaigrette in a small saucepan over medium heat until it simmers. Add cucumbers, let simmer for a minute and remove from heat. Allow cucumbers to cool until slightly warm; add sprigs of dill and stir to mix. Cool to room temperature or chill before serving.


Height of Summer Tomato and Basil salad
1 pint of grape tomatoes, halved (Gale-Wyn Farms)
Fresh basil cut in a chiffonade (Seneca Vegetables)
Maple Lemon-Lime Basil Vinaigrette (Canadice Kitchens/Sugarbush Hollow)
Salt and pepper to taste

Toss tomatoes, basil, vinaigrette (start with a couple of tablespoons and add more if desired), salt and pepper.

Lime-kissed Fire Roasted Corn
Unshucked ears of corn (Jones Brook Produce)
Lime wedges
Salt and pepper

Heat grill to medium high. Peel back the corn husks, being careful not to remove them completely, and remove the corn silk. Pull the husks back up over the corn so the ear is covered by the husk. If necessary, tie a spare piece of husk around the end of the corn to keep the husk closed.

Place the corn in their husks on the hot grill; cover. Turn the corn occasionally, until the husks are charred on all sides, about 15 to 20 minutes.

Remove corn from grill and allow to sit for 5 minutes. Remove the husks from the corn, and rub the ears with lime wedges. Season with salt and pepper.

Market Fresh Peach Blueberry Lemonade
8 ripe peaches, washed and pitted
2 pints of blueberries, picked over and rinsed
1 whole lemon, rinsed
Honey, to taste

Combine peaches, blueberries, and lemon in a juicer and process. Taste, and adjust sweetness by adding honey if needed. Garnish with a lemon wedge and extra berries.

Monday, August 10, 2009

Cooking as a Spectator Sport: An Interview with Michael Pollan


Here's an interesting interview with Michal Pollan on cooking as a spectator sport. I don't agree with everything he says (particularly about the obesity epidemic; this has shaped my thinking on that topic) but the idea that cooking was a giant evolutionary step is particularly provacative.

Saturday, August 08, 2009

Ultimate Finger Lakes Burger Challenge at the Canandaigua Farmers' Market


Slice Dice & Spice NY is an effort by Visit Finger Lakes to promote local food. They're hosting three farmers' market challenges in which a total of nine foodies shop their local market to find ingredients to build the Ultimate Finger Lakes Burger. Once all the events are completed, recipes & photos will be posted to the Slice, Dice & Spice NY site and open to online voting. Click here for info.

I was lucky enough to be included in the event and had such a good time!

Gale, Chris and I were worked with Chef David Buchanan from Bristol Harbor at the Canandaigua Farmers' Market Challenge. Chef David is so talented, thoughtful and all-around awesome that Shane & I are already planning a trip to Bristol Harbor for dinner.

If interested, you can view video of the event (my butt makes an appearance around minute 3:15 -- whee!) and more pictures (in which I look nefarious, because THE CAMERA DOESN'T LIE).

BIG thank yous to Chef David, Gale, Chris and, especially, the hard-working folks at Slice, Dice & Spice NY!

Thursday, August 06, 2009

Indian-Spiced Pulled Chicken Sandwiches


What can I say about this sandwich, except NOM NOM NOM NOM NOM ?

Ok, I can say a bit more: it's perfect for summer because you don't have to turn on the oven. It's got a curry/mango kick. It takes advantage of all that fresh arugula that's available right now.

And it's freakin' delicious. So, to reiterate: NOM NOM NOM NOM NOM.


Indian-Spiced Pulled Chicken Sandwiches (adapted)

3/4 cup plain whole-milk yogurt
3/4 cup mango chutney
2 Tbsp. fresh lime juice
2 tsps. curry powder
4 cups shredded rotisserie chicken
2 scallions, thinly sliced
salt and freshly ground pepper
1 cup baby arugula leaves
4 very soft rolls, split

In a medium bowl, whisk together the yogurt, chutney, lime juice and curry until blended . Add the shredded chicken and scallions and toss well. Season with salt and pepper. Place arugula on the rolls, top with the pulled chicken salad and enjoy.

Serves 4.

Wednesday, August 05, 2009

Chocolate and Vanilla Ice Cream Cake


Happy Birthday, Sadie!

Today is Sadie's 11th Birthday. And we celebrated, at her request, with a homemade ice cream cake.

Make an ice cream cake from scratch is dead simple. (Time-consuming but simple.) Basically, I followed the instructions outlined in this guide and made a few tweaks. I'd recommend watching the video before making this cake simply to get a visual of what to do, but it really is easy. And delicious.

I did not use my own ice cream for this cake, but that is my next ice cream cake goal. If you use store-bought, make sure to choose a high-quality brand so that the cake's taste is fantastic as its aesthetics.


Chocolate and Vanilla Ice Cream Cake
1 package of Oreo cookies
1/4 cup butter, melted
1 qt. chocolate ice cream
1 qt. vanilla ice cream
non-dairy whipped topping, thawed
sprinkles (optional)
cake decorating gel (optional)

Place chocolate ice cream in the refrigerator and allow to soften.

Set aside 6 Oreo cookies. Crush the remaining cookies and, in a medium bowl, mix cookie crumbs thoroughly with the melted butter.

Press half to two-thirds of the cookie crumbs into the bottom of a springform pan. (The amount you use with determine the thickness of the cake's crust.) Set the remaining crumbs aside. Place springform pan in the freezer for 10 minutes to allow the crust to harden.

Place softened chocolate ice cream into a medium bowl and stir; it should be smooth and spreadable. Remove springform pan from the freezer and spread the chocolate ice cream evenly over the chocolate cookie crust. Sprinkle the surface of the ice cream with the remaining cookie crumbs (use as much or as little as you choose) and gently press the crumbs into the ice cream. Cover the pan with aluminum foil and chill in the freezer until hard, at least four hours.

Once the cake layer is almost ready, place the vanilla ice cream in the refrigerator and allow to soften. Once the vanilla ice cream is ready, remove springform pan from the freezer and spread the vanilla ice cream evenly over the chocolate ice cream and cookie crumb layer. Recover the pan with aluminum foil and chill in the freezer until hard, at least four hours.

Remove the pan from the freezer and run a hot knife between the edge of the ice cream cake and the walls of the pan (this will help prevent the cake from cracking). Open the latch on the springform pan and remove the sides.

Place the cake on a cake decorating turntable or plastic cutting board and frost with the whipped topping. Split apart the reserved Oreo cookies and place the halves around the sides of the cake. If desired, decorated with sprinkles and decorating gel.

Return cake to freezer and chill for 3 to 4 hours until hardened. Before serving, allow to soften in the refrigerator for 10 minutes. Slice cake with a knife warmed in hot water; dry knife before slicing .

Tuesday, August 04, 2009

Ultimate Finger Lakes Burger Challenge: IT'S ON!


Guess what?

I've been tapped to compete in Slice, Dice + Spice NY's Ultimate Finger Lakes Burger Challenge.

(YAY! And ... gulp.)

What's it all about? Here's info from the Slice, Dice + Spice site:

Are you ready to watch us build the Ultimate Finger Lakes Burger?

A total of nine Foodies have been selected to participate in each of the 3 Slice, Dice and Spice Farm Market Challenges at the Ontario County Farmers Markets in August. Each Foodie will be given $50 to use to purchase ingredients that they feel will create the Ultimate Finger Lakes Burger and side dish.

These Market Basket selections will be given to an Ontario County Chef (a select chef will be chosen for each of the 3 local Farmers Markets) and each of these Chefs will create three burgers and side using the very fresh from the farm, Finger Lakes ingredients. Then, the total of nine recipes will be posted on the Slice Dice and Spice NY website where YOU - Joey Q. Public - will be invited to try this recipe at home and vote ~ online for your favorite.

The shopping and cooking demonstration will be video taped and broadcast on the Slice Dice and Spice NY website and portions will be promoted on You Tube as well. This is a challenge that is live, lively and dependent upon you - the Ultimate Finger Lakes Foodie.

Did you see that? There will be online voting (hint, hint).

If you're in the area, please feel free to come down to the Canandaigua Farmers' Market this Saturday and watch the fun. Shopping starts at 8:30am, cooking begins at 9am. (I know it's early, but you can get a morning jolt with coffee from The Dalai Java and pastry from Kitchen Blessings or Peight Bakedgoods!)

If you can't make it, rest assured: I will remind you - repeatedly - to vote for me.

Friday, July 31, 2009

Shrimp Fried Rice


I know this is weird but, after boiling up some shrimp for dinner, I had leftovers. (There was leftover shrimp -- when does *that* ever happen?)

Not wanting to let shrimp go to waste (because they're shrimp and not using them up would be a crime against both nature AND the culinary gods) I went off in search of a fried rice recipe.

Kian and Sadie LOVE fried rice. We've taken them to Japanese teppan/hibatchi restaurants Plum Garden and Da Ru Ma (where I always order the lobster and filet mignon combo because, c'mon, how can I not?) and, on top of loving the cooking theatrics, the kids dive right into the fried rice.

I came upon this post for fried rice by Jaden Hair, hosted on Simply Recipes -- it is fantastic. Not only does Jaden provide a stand-up recipe, she explains the hows and whys behind fried rice: use day-old rice for an ideal end result, cook over high heat, fry the ingredients separately.
You don't need a wok, either. Read her post for more details.

The recipe is dead simple, comes together quickly, and tastes fabulous. Plus, once you've tried it out, you can easily see where substitutions can be made. No shrimp? Try chicken or pork -- or leave the meat out altogether and just roll with the eggs. Go vegan my swapping out the meat and eggs in favor of tofu. I replaced green onions with Bianca Di Maggio onions from my CSA (admittedly, not a *huge* difference); garlic scapes or even some diced white onion would work, too. I snuck in some whole grains and fiber by using brown rice over white rice.

So, take look what you've got in your fridge and pantry and let your mind play with the possibilities of tonight's dinner: fried rice.

Shrimp Fried Rice (adapted)

8 oz. cooked, peeled and deveined shrimp, chopped into bite-sized pieces if needed
2 Tbsp. cooking oil, divided
3 eggs, beaten
2 stalks green onion, minced
4 cups leftover brown rice, grains separated well
3/4 cup frozen peas, defrosted
1 Tbsp. soy sauce
1 tsp. sesame oil

Heat a wok or large sauté pan to medium heat; add 1 tablespoon of the cooking oil and swirl to coat pan. Add the eggs, stirring to break up and scramble the eggs with a spatula (use a high-heat proof plastic spatula if cooking on a non-stick surface). When the eggs are almost cooked through (they should still be slightly runny in the middle), scoop out the eggs to a separate bowl and set aside.

Wipe out the wok or sauté pan with a paper towel, add the remaining cooking oil and turn to high heat, swirling to coat. When the oil is very hot, add the green onions and fry until fragrant, about 15 seconds. Add in the rice and stir well to mix in the green onions throughout. Spread the rice all around the pan and let the rice heat up, untouched, until you hear the bottoms of the grains sizzle, about 1-2 minutes. Use the spatula to toss the rice, again spreading the rice out over the surface of the pan.

Drizzle the soy sauce over the rice and toss. Add the peas, the cooked eggs, shrimp and sesame oil, tossing to mix evenly. Let everything heat back up again, taste and add an additional teaspoon of soy sauce if needed.

Serves 4.

Thursday, July 30, 2009

Black Raspberry Muffins

Guess what? This is post #501. What a long, strange trip it's been...


"If I were stranded on a deserted island and could only bring one food," said Sadie, "it would be these muffins."

You will have to make them yourself to see if you agree.

Black Raspberry Muffins (adapted from Cook's Illustrated, via The Bitten Word)

2 cups fresh black raspberries, washed and picked over
1 cup plus 2 Tbsp sugar, and another 1 tsp. sugar, separated
2 large eggs
4 Tbsp. (½ stick) unsalted butter, melted and cooled slightly
¼ cup vegetable oil
3/4 cup whole milk
1½ teaspoons vanilla extract
2 1/2 cups all-purpose flour
2 1/2 tsp. baking powder
1 tsp. salt
More sugar for sprinkling (I used vanilla sugar)

Adjust oven rack to upper-middle position and heat oven to 425-degrees. Line a standard muffin tin with muffin liners, and lightly oil the top of the pan with oil.

Bring 1 cup berries and 1 teaspoon sugar to simmer in small saucepan over medium heat. Cook, mashing berries with spoon several times and stirring frequently, until berries have broken down and mixture is thickened and reduced to ¼ cup, about 6 minutes. Transfer to small bowl and cool to room temperature, 10 to 15 minutes.

Whisk remaining 1 cup plus 2 Tbsp. sugar together with the eggs in medium bowl until thick and homogeneous, about 45 seconds. Slowly whisk in butter and oil until combined. Whisk in buttermilk and vanilla until combined.

In a large bowl, whisk together flour, baking powder, and salt together in large bowl. Using rubber spatula, fold egg mixture and remaining cup blueberries into flour mixture until just moistened. (Batter will be very lumpy with few spots of dry flour; do not over mix.)

Use an ice cream scoop, large spoon or 1/3 cup dry measuring cup to divide batter equally among prepared muffin cups (batter should completely fill cups and mound slightly). Spoon a teaspoon of cooked berry mixture into center of each mound of batter. Using chopstick or skewer, gently swirl berry filling into batter using figure-eight motion. Sprinkle additional sugar evenly over muffins.

Bake until muffin tops are golden and just firm, 17 to 19 minutes, rotating muffin pan from front to back halfway through baking time. Cool muffins in muffin tin for 5 minutes, then transfer to wire rack and cool 5 minutes before serving.

Wednesday, July 29, 2009

Cinnamon Raisin English Muffins


Thomas has nothing on me.

And certainly nothing on Nicole, who developed this recipe.

In the convenience of your own kitchen, you can whip up cinnamon-raisin English muffins -- from scratch -- in about an hour. (And most of that is sitting around, waiting for the yeast to do its thing.) Your kitchen can be filled with the scent of cinnmony goodness, your toaster can pop up tasty little treats, and your mouth can be made happy by a breakfast favorite -- made that much better because these babies are fresh.

I may never buy another packaged English muffin again. Sorry, Thomas.


Cinnamon Raisin English Muffins (adapted from Baking Bites)
1/3 cup water, warm (about 110 degrees F)
1 Tbsp sugar
2 1/2 tsp active dry yeast
1 cup fat fat milk (100-110 degrees F)
3/4 tsp salt
1 1/2 tsp ground cinnamon
2 cups flour
1/3 cup raisins

Whisk together water, sugar and yeast in a large bowl; let mixture stand for 10 minutes until slightly foamy.

Stir in remaining ingredients, except the raisins, and mix until smooth. Stir in the raisins, cover with plastic wrap and set aside for 45 minutes to relax and rise.

Lightly grease a frying pan with cooking spray and heat over medium heat.

Drop dough by 1/4 cupfuls (it will be sticky) onto the pan and cook until medium brown on the bottom. The top and sides will appear set and/or a bit dry; this should take a few (or maybe more) minutes. Flip over and cook other side until brown.

Cool on muffins on a wire rack for at least 15 minutes. To serve, split with a fork and toast.


Makes about 10 muffins.

Friday, July 10, 2009

Grilled Flank Steak with Soy-Chili Glaze


Try to look past the messy composition of this picture, and just stare at the deliciousness of this flank steak. Because it is frickin' amazing.

This steak comes from Bedient Farms, which I can not heap enough praise upon. I don't know what owner Angela Bedient feeds her cows but it must be something fabulous. I think they might actually live like the cows in those Californial cheese commercials.

Speaking of commercials, when you bite into this steak -- well, after you've recovered from the explosion of flavor bursting on your tongue, and after you've regained consciousness from delicious-overload -- that Beef: It's What's for Dinner song will pop in your head and you will remember all that is wonderful about eating beef again.

Grilled Flank Steak with Soy-Chili Glaze (adapted)

1 Tbsp. vegetable oil
1 Tbsp. minced garlic
1 Tbsp. finely grated fresh ginger
1/2 cup soy sauce
1/3 cup lightly packed dark brown sugar
1/2 teaspoon chili powder
2 1/4 pounds flank steak
Salt and freshly ground pepper
Lime wedges

Light a grill or preheat a grill pan. In a small saucepan, heat the oil. Add the garlic and ginger and cook over moderately high heat, stirring occasionally, until the garlic begins to turn golden. Add the soy sauce, sugar and crushed red pepper and cook, stirring, until syrupy, about 3 minutes; let cool.

Season the steak with salt and pepper. Grill the steak for 10 minutes for medium-rare meat, turning once; during the last minute, brush all but 2 tablespoons of the glaze over the steak. Transfer the steak to a cutting board and let stand for 5 minutes.

Thinly slice the steak and brush with the reserved 2 tablespoons of glaze. Transfer to a platter and serve with lime wedges.

Wednesday, July 08, 2009

Cold-Brewed Iced Coffee (Hot, too)

Photo courtesy of Kanko'


One of my favorite summer drinks is iced coffee. A jolt of caffeine and a hit of sugar, mellowed by a bit of cream is the best way to start the day.

The thing is that, if I buy iced coffee – from Starbucks or Dunkin Donuts or even the coffee bar at Wegmans – I’m out about $3 each day, which, if you remember your multiplication tables, can add up to $21 a week.

That’s a lot of cash for a beverage, especially when it’s watered down, overly bitter and not alcoholic. (Plus, I could use that money to buy something at deep discount from Anthropologie.)

So I’ve started making my iced coffee at home, using the cold brew method. It’s very simple: mix ground coffee with water, let it sit for 12 hours, filter out the grounds, then mix the coffee concentrate with water and ice for a delicious iced coffee. If you’re in the mood for hot coffee, mix the concentrate with water in a mug and nuke it in the microwave and –-bam-- hot cold-brewed coffee.

It’s easy, it’s fun, it tastes good. What are you waiting for?

Cold-Brewed Iced Coffee (source)

1/3 cup ground coffee (medium-coarse grind is best)
1 1/2 cups water
Milk & sugar (optional)

In a pint jar, stir together coffee and water. Cover and let rest at room temperature overnight or 12 hours.

Strain twice through a coffee filter, a fine-mesh sieve or a sieve lined with cheesecloth. In a tall glass filled with ice, mix equal parts coffee concentrate and water, or to taste. If desired, add milk and sugar.

NOTE: To make hot coffee, dilute concentrate one-to-one with water and heat in the microwave.

Yield: Two servings.

Tuesday, July 07, 2009

Very Vanilla Ice Cream

It's summer and we need to eat ice cream.


Vanilla isn't usually my go-to flavor; I like something different, something a little more adventurous. But when making ice cream at home, for a crowd, vanilla is a flavor everybody likes. And, frankly, when vanilla ice cream turns out this well, it should be a go-to flavor.

This recipe yields a wonderfully rich and creamy ice cream that packs a strong vanilla punch. It's not a wallflower vanilla; it can stand on its own. But if you felt like pairing it with other things, like some blueberries and blackberries heated up on the stove with a bit of berry jam, or in a tall, fizzy root beer float, fear not: this vanilla ice cream plays well with others.

Very Vanilla Ice Cream (adapted)

1 vanilla bean
1 tsp. vanilla extract
3 cups heavy cream
1 cup whole milk
1 1/2 cups sugar
3 large eggs

With a knife, halve vanilla bean lengthwise. Scrape seeds into a large heavy saucepan and stir in extract, cream, milk, and sugar. Bring mixture just to a boil, stirring occasionally, and remove pan from heat.

In a large bowl, lightly beat eggs. Add hot cream mixture to eggs in a slow stream, whisking, and pour into pan. Cook custard over moderately low heat, stirring constantly, until a thermometer registers 170-degrees. (This may happen instantaneously; do not let boil.) Pour custard through a sieve into a clean bowl and cool. Chill custard, its surface covered with wax paper, at least 3 hours or until cold, and up to 1 day.

Freeze custard in an ice-cream maker according to manufacturer's instructions, in 2 batches if necessary. Transfer ice cream to an airtight container and put in freezer to harden. Ice cream may be made 1 week ahead.

Yields 1.5 quarts.

Saturday, July 04, 2009

Happy Independence Day!

Wishing you, your friends and your family a festive and fun-filled 4th of July!

Glazed Sugar Cookies


For the cookies:
3/4 cups butter, softened
1 cups white sugar
2 eggs
2.5 cups all-purpose flour
1 teaspoons baking powder
1/2 teaspoon salt

In a large bowl, cream butter and sugar together until smooth. Beat in eggs and vanilla. Stir in the flour, baking powder, and salt. Cover, and chill dough for at least one hour (or overnight).

Preheat oven to 400-degrees F. Roll out dough on floured surface 1/4 to 1/2 inch thick. Cut into shapes and place cookies 1 inch apart on a parchment-lined cookie sheets.
Bake 6 to 8 minutes until light golden brown. Cool completely before glazing.
Yields about 30, 2-inch cookies

Glaze

1 cup confectioners' sugar
1 Tbsp. light corn syrup
2 Tbsp. water or milk
food coloring, if desired (I used gel food coloring)
1 tsp. extract (almond, orange, etc.; vanilla extract will turn white icing tan)

Stir confectioners' sugar, corn syrup, and water together. Stir in food coloring if desired. Stir glaze before each use to ensure a uniform color.

Friday, July 03, 2009

Risk of mad cow disease from farmed fish?

Jesus H. Christ, are you kidding me?

Reuters
Fri Jun 26, 2009 4:59pm EDT

Risk of mad cow disease from farmed fish?

NEW YORK (Reuters Health) - Three U.S. scientists are concern about the potential of people contracting Creutzfeldt Jakob disease -- the human form of "mad cow disease" -- from eating farmed fish who are fed byproducts rendered from cows.

Mad cow disease, also called bovine spongiform encephalopathy is a fatal brain disease in cattle, which scientists believe can cause Creutzfeldt Jakob disease in humans who eat infected cow parts.

In the latest issue of the Journal of Alzheimer's Disease, Dr. Robert P. Friedland, a neurologist at University of Louisville in Kentucky and colleagues suggest that farmed fish fed contaminated cow parts could transmit Creutzfeldt Jakob disease.

[Farmed fish are fed COW PARTS? --LRK]

The scientists want government regulators to ban feeding cow meat or bone meal to fish until the safety of this common practice can be confirmed.

Eating fish at least two times a week is widely recommended because of the beneficial effects of omega-3 polyunsaturated fatty acids on the heart and brain, they note.

"We are concerned," Friedland and colleagues write, that eating farmed fish may provide a means of transmission of infectious proteins from cows to humans, causing variant Creutzfeldt Jakob disease.

"We have not proven that it's possible for fish to transmit the disease to humans. Still, we believe that out of reasonable caution for public health, the practice of feeding rendered cows to fish should be prohibited," Friedland said in a prepared statement. "Fish do very well in the seas without eating cows," he added.

The risk of transmission of made cow disease to humans who eat farmed fish "would appear to be low," the scientists emphasize, because of perceived barriers between the species, but that's no guarantee that it can't happen.

"The fact that no cases of Creutzfeldt Jakob disease have been linked to eating farmed fish does not assure that feeding rendered cow parts to fish is safe," Friedland said.

"The incubation period of these diseases may last for decades, which makes the association between feeding practices and infection difficult," he points out.

"Enhanced safeguards need to be put in place to protect the public," Friedland concludes.

SOURCE: Journal of Alzheimer's Disease, June 2009.

Wednesday, July 01, 2009

Roasting kohlrabi

See these things?


These are kohlrabi. Kohlrabi are in the broccoli family; both the root and the leaves are edible. Though they're available year-round (if you can find them; I only see them in this area through my CSA or sometimes at the farmers' market) they're most abundant in early summer.

So what do you *do* with them? Lots and lots; from Chow.com : "Cut into slices or wedges and add to Chinese stir-fry or Indian curry. Combine peeled kohlrabi with potato when making scalloped potatoes. Dip kohlrabi slices or sticks into tempura batter and deep-fry. Add shredded kohlrabi to coleslaw for extra crunch."

But for a very easy prep, remove the leaves, throw away the stems and any tough center ribs, then shred the leaves. Saute with a bit of olive oil and garlic; finish with salt and pepper. (Or use leaves in any recipe that calls for a slow-cooked green.)

As for the bulbs, pare away the tough outer skin then jump into Alanna's recipe for roast kohlrabi. Essentially, you'll dice the peeled kohlrabi, toss with olive oil, garlic and salt, then roast in a 450-degree oven for about 30 to 35 minutes, stirring the cubes every five minutes once you've reached the 20 minute mark. Once they're done, serve immediately as is, or toss with your favorite vinegar.

It really doesn't get much easier than that. The finished product is reminiscent of broccoli but better as the roasting caramelizes the kohlrabi's sugars and the garlic perks the whole thing up. So easy, so delicious.

Saturday, June 27, 2009

The Daring Bakers' Challenge: Bakewell Cluster ...er Tart…er…pudding


The June Daring Bakers' challenge was hosted by Jasmine of Confessions of a Cardamom Addict and Annemarie of Ambrosia and Nectar. They chose a Traditional (UK) Bakewell Tart... er... pudding that was inspired by a rich baking history dating back to the 1800's in England.

A Bakewell Tart consists of three parts: a shortbread-crust, a jam layer, and a sponge-like frangipane.

I had high hopes for this challenge. The shortbread crust came together nicely and the scraps baked up into lovely cookies when topped with a bit of jam. I made the jam with strawberries I bought from my CSA; it, too, was delicious.

And then there's the frangipane. I don't know where I went wrong, but I began to suspect a problem when the frangipane starting poofing up on oneside and staying flat on the other. By the time it came out of the oven, the top of the tart looked like a mountain range. A mountain range oozing butter. Once it cooled, the rough-terrain flattened out a bit, but still: atop it sat a buttery Lake Titicaca. I poured off the liquid and let the tart cool fully.

Sure, it looks normal but the taste ... well, let's just say I can see where the dessert was supposed to go, but am keenly aware of what its lacking.