Showing posts with label Confections. Show all posts

Tuesday, February 17, 2009

Heart Shaped Samoas


Do you follow Nic's Baking Bites ? It's filled with lots of tempting sweets and a week doesn't go by without a post that makes me drool.

Nic is especially good at recreating beloved recipes, especially Girl Scout cookies. She's got Thin Mints, Homemade Do-Si-Dos , Homemade Tagalongs and, Shane's favorite, Samoas.

So for Valentine's Day, I decided to follow Nic's Samoa recipe, but make the traditionally round cookies into hearts.

The verdict? YUM! With chewy caramel, toasted coconut, a buttery shortbread base, all kissed by dark chocolate, how could you go wrong? I'd say it was a spot-on recreation but this is so much better than the original. Those Girl Scouts better watch their backs...

The trickiest part of the recipe was spreading the coconut caramel topping onto the shortbread cookie base. The topping is awfully sticky and wanted to cling to almost everything it touched -- except the cookie. Eventually, I just used a spoon to spread the topping onto the cookie and, as the caramel & coconut cooled, I pressed it more firmly onto the cookie and shaped it into hearts.

Nic recommended Werther's Chewy Caramels but I was unable to find them at the store (what's up with that, Wegmans?!?) so I picked up Brach's Milk Maids instead. The end result was very tasty, but the caramel & coconut was a bit chewier than I would have liked; a softer caramel (but NOT a flowing one) would have been better.

I left the half the heart-shaped shortbread cut outs free of the coconut caramel, leaving some simply plain (for Kian's valentine gift), and others drizzeled in chocolate (for Sadie).

The unused caramel coconut topping didn't go to waste, however; it was pressed into a rectangle about 1/4-inch thick, allowed to cool, and then cut into bite sized pieces. Voila! Tasty caramel coconut chews.


Homemade Samoas from Nic's Baking Bites (slightly adapted)

Cookies
1 cup butter, soft
1/2 cup sugar
2 cups flour
1/4 tsp baking powder
1/2 tsp salt
1/2 tsp vanilla extract
up to 2 Tbsp milk

Preheat oven to 350-degrees.

In a large mixing bowl, cream together butter and sugar. Mix in flour, baking powder and salt at a low speed, followed by the vanilla and milk, adding in the milk as needed to make the dough come together without being sticky (it’s possible you might not need to add milk at all). The dough should come together into a soft, not-too-sticky ball. Add in a bit of extra flour if your dough is very sticky.

Working in two or three batches, roll out the dough between pieces of wax or parchement paper to about 1/4-inch thickness (or slightly less) and cut out shapes using a 1 to 1 1/2 -inch cookie cutter.

Place on a parchment lined baking sheet. If you'd like to make your rounds look just like samoas, use the end of a wide straw to cut a smaller center hole.

Bake cookies for 10-12 minutes, rotating the pans halfway through, until bottoms are lightly browned and cookies are set.

Cool for a few minutes on the baking sheet then transfer to a wire rack to cool completely.

Coconut Caramel Topping
3 cups shredded coconut (sweetened or unsweetened)
12-oz good-quality chewy caramels
1/4 tsp salt
3 tbsp milk
1/2 tsp vanilla (optional)
8 oz. semisweet chocolate (chocolate chips are ok)

Preheat oven to 300 degrees. Spread coconut evenly on a parchment-lined baking sheet (preferably one with sides) and toast 20 minutes, stirring every 5 minutes, until coconut is golden. Cool on baking sheet, stirring occasionally. Set aside.

Meanwhile unwrap the caramels and place in a large microwave-safe bowl with salt, milk, and vanilla. Cook on high for 3-4 minutes, stopping to stir a few times to help the caramel melt. When smooth, fold in toasted coconut with a spatula.

Using a small spoon or small offset spatula, spread topping on cooled cookies, using about 2-3 tsp per cookie. Reheat caramel for a few seconds in the microwave if it gets too firm to work with.

While topping sets up, melt chocolate in a small bowl. Heat on high in the microwave in 45 second intervals, stirring thoroughly to prevent scorching. Dip the base of each cookie into the chocolate and place on a clean piece of parchment paper. Transfer all remaining chocolate (or melt a bit of additional chocolate, if necessary) into a piping bag or a ziplock bag with the corner snipped off and drizzle finished cookies with chocolate.

Let chocolate set completely before storing in an airtight container.

Yields 3 1/2 to 4 dozen cookies.

Friday, January 02, 2009

Lace Cookies (Now Gluten Free!)


I've written about these before but here I go again: these cookies are really so delicious that they're irresistible. Lace cookies (aka, Florentines) are crispy, wafer thin cookies with an amazing carmelized sugar and browned butter flavor that sandwich a thin layer of dark chocolate.

Jenny is throwing a party on Sunday and wanted a few goodies that can be eaten by everyone, including a few guests who can't have gluten. If you take a look at the original lace cookie recipe, you'll see there's a minimal amount of flour, making it easy (ridiculously easy) to adapt to gluten free.

We swapped out the flour for almond meal (left over from December's Daring Baker Challenge) and, to be on the safe side, used gluten free oats (meaning, they were not processed in a facility near wheat products). The result is virtually identical: the only differences I've noticed are a slightly nuttier flavor than the originals (duh) and the GF version seem to have stayed crisper longer.

But still friggin' delicious.


Lace Cookies
1-1/2 cups uncooked regular oatmeal
1-1/2 cups light brown sugar
2 Tbsp. almond meal
1/2 tsp. salt
2/3 cup melted butter
1 egg, lightly beaten
1/2 tsp. vanilla

Preheat oven to 350-degrees and line baking sheets with parchment paper. Mix the oatmeal, sugar, flour, and salt in a bowl. Stir in the melted butter, then add the egg and vanilla and mix well. Arrange the batter by half-teaspoonfuls on the sheet, about 2 inches apart on the baking sheets. Bake until lightly browned, about 5 minutes. Cool slightly and remove the cookies with a spatula as soon as they are firm. (If they become to hard, pop them back in the oven for a moment to soften –- but my kitchen if icy and I've never run into this problem, so you probably won’t have to worry about it.) Yields about 60 cookies. Once the cookies cool, place them gently in an airtight container or continue to the next step.

Chocolate Filling
1 bag of dark chocolate chips (I used Ghirardelli's 60% cocoa)

Place chips into a microwave-safe, plastic zip-top bag. Microwave for approximately 1 minute on 40-percent power, and “smush” the chocolate with your hands. Continue microwaving the chocolate for 30 second intervals at 30-percent power until melted, smushing between turns.

Once your chocolate has melted, snip a small corner off the bag to create a homemade pastry bag. Place a small dollop of chocolate in the center of a lace cookie (flat side up) and delicately top with another cookie (flat side down against the chocolate). Press the cookies together gently so the chocolate spreads evenly. Rest to dry on a cooling rack.

If you have leftover chocolate after filling the cookies (you probably will) squeeze the chocolate into another zip-top bag. Line your cookies up on your cooling rack, placing paper beneath the rack to catch extra chocolate. Make a tiny snip in the zip-top bag’s corner so that when squeezed, you’ll get a thin ribbon of chocolate. Working quickly, squeeze the chocolate over the cookies on a diagonal from left to right. Your cookies should have little chocolate stripes. Repeat the technique, this time moving from right to left. Now your cookies should have a diamond pattern on them. Don’t worry about being perfect; they’ll look beautiful. (If you’re feeling ambitious, melt white chocolate and drizzle on the cookies for a nice contrast.) Once dry, store in an airtight container.

Wednesday, October 31, 2007

Untitled Pretzel, Marshmallow, M&M Project


These are the easiest, and one of the tastiest, little treats you can make. You can whip up a huge batch in under 10 minutes, and if you bring them to a party, people will love you. There's something about the combination of salty, crunchy pretzels, paired with chewy marshmallows and the sweetness of chocolate that makes taste buds swoon.


The only thing is that I don't have an all-purpose name for them. Sadie came up with Shrunken Monkey Heads for the Halloween Party, but that wouldn't really fly at a Christmas bash, would it?

Got name suggestions? Post 'em in the comments!


Untitled Pretzel, Marshmallow, M&M Project

mini marshmallows
mini pretzels
M&Ms

Place pretzels on a large, flat plate lined with parchment. Place marshmallows in each of the pretzels' holes. Microwave the marshmallow-filled pretzels until the 'mallows swell in size, approximately 15 to 20 seconds.

Pull the pretzels from the microwave and, working quickly, press an M&M into the center of each marshmallow. Allow to cool. Store in an airtight container.

Tuesday, October 16, 2007

Vosges' Mo's Bacon Bar


Chocolate + salt + bacon pieces = Mo's Bacon bar.

I really like the combination of sweet and salty. Chocolate covered pretzels, chocolate chip cookies with a slightly salty hit, and salted caramels are all up my alley.

So I nearly dropped dead when I spotted Mo's Bacon Bar at Parkleigh. Chocolate and Bacon? ("You got chocolate in my bacon!" "Hey, you got bacon in my chocolate!") I was already a fan of Vosges' milk chocolate, a smooth, creamy concoction. I can imagine some might find it too sweet, but I like it very much.
Biting into the Mo's bar, the chocolate has a decent snap. The first flavor that hits you is the chocolate, followed quickly by smoky salt notes. A very tasty combination.

And then you realise you're eating bacon. Once the chocolate melts away, you're left with little chewy bits of bacon and it's a texture I don't care for in the context of chocolate. It puts me off so much that I can't fully enjoy the flavor of the bar.

So, overall: good flavor, weird texture. I think Vosges could achieve a similar flavor profile -- without using pork -- by swapping the bacon for smoked almond bits. The bar would still combine sweet, smoky, and salty elements but the crunch of the almonds would be a nice contrast to the yielding texture of the chocolate.

Then again, "Mo's Smoky Almond Bar" just doesn't have the same impact.

Tuesday, May 08, 2007

Nutella S'mores


We had marshmallows. We had graham crackers. We had a campfire and long, lean sticks.

But no chocolate. Nutella was an excellent stand-in. In fact, I think I prefer it...


Nutella S'mores

1 graham cracker, broken in half
1 well toasted marshmallow (lightly browned on the outside, flowing and hot on the inside)
about two teaspoons of Nutella (more or less to taste)

Spread the Nutella on one half of the graham cracker. Top with marshmallow, followed by the other half of the cracker. Smoosh down and enjoy.

Wednesday, April 18, 2007

Butter Mints

It took me a while to get the size of the mints just right.
Smaller is better.


Late last week, Tera, a reader, send me an email asking me to test out a butter mint recipe. "I made this four times and could not get it to work," she wrote. "Since it was published in Taste of Home magazine, I know that it is possible to make. I could not get it to stretch to cut. It became more of a grainy mint. They were delicious, but not the correct texture."

The recipe reminded me of making taffy: bringing sugar, water, and butter to a boil, adding the flavoring, and pulling the cooled mixture with your hands.

I participated in a taffy pull in high school. All I remember is a syrupy mess, a chaotic kitchen and an extraordinarily sticky floor.

I wasn't too keen on reliving that experience, so I did a Google search for the Taste of Home recipe and found this -- apparently, LOTS of people had problems with this recipe. "I tried this recipe twice and both times it failed to produce what the recipe claimed." "All I was able to make was mint sugar." "I as well followed the directions specifically and am not sure what would be missing from this recipe or wrong because as it stands, it doesn't work." Etc., etc., etc.

Instead, I tried this recipe and, although it appeared to turn out better than the other recipe, I still had problems. For the life of me, I can't imagine how the mixture could be cut into shapes; the "dough" isn't sturdy enough. You can, however, take small amounts of the mixture and, with well buttered hands, roll it into small balls. I prefer to roll the mints in a powdered sugar as well. The recipe below is adapted from the original.

As for the taste, it's good: sweet, minty, and rich. The only problem is that I have trouble getting past the idea that I'm eating (at best) pure frosting or (at worst) sweetened and flavored butter. The powdered sugar helped me think of the mints as a more of confection.

Butter Mints

1/2 cup butter, softened
1 package (1 pound) confectioners' sugar, or more if needed
1 tablespoon milk
1 teaspoon vanilla extract
1/2 teaspoon peppermint extract
paste food coloring, optional

In a mixing bowl, cream the butter. Gradually add sugar, cream and extracts; beat on medium speed for 3-4 minutes. If the mixture seems a soft, add a bit more confectioners' sugar. Add food coloring and mix to combine.

Line a cookie sheet with parchment paper and butter your hands well. Form mixture into small balls, rolling in additional powdered sugar if desired. Place the ball on the cookie sheet and repeat the process. Chill the mints for at least two hours before serving.

Tuesday, April 10, 2007

Keeping Chocolate, Chocolate

"What?! They might reclassify chocolate?"

As a large -- and timid -- chocolate bunny stares at me from its bed of Easter grass, waiting for the moment in which I bite its little ears off, I'm thinking about a proposal put forth to the FDA.

That chocolate bunny -- tall, dark, and handsome; sweet, smooth, and decadent -- might next year have an inferior replacement. The Chocolate Manufacturers of America (CMA) in collaboration with the Grocery Manufacturers Association have petitioned the FDA to change the definition of chocolate, so that products made with milk substitutes and without cocoa butter can be sold under the label of "chocolate." Why? So the manufacturers can save money by selling cheap crap. (Check out the specific proposed changes.)

People, GREEDY CAPITALISTS ARE ATTACKING CHOCOLATE! (Nooooooooooooooooo!)

Now, if you're thinking "So what?" I want you to do a little experiment. Go down to your local grocery or drug store and pick up the cheapest, crappiest "mocklate" you can find (I'd recommend that Palmer Bunny Munny that are on sale right now).

Take a bite. Roll it around in your mouth. Maybe you're not going to spit it out (though you should) but obviously it's nowhere near as good as real chocolate. (You might want to eat a whole box of good chocolate just to make sure.)

OK, now here's the scary part: if this petition passes and the FDA reclassifies chocolate, the Palmer stuff -- and confections WORSE than Palmer, made with less care and quality -- could flood the market and still be called chocolate.

The big manufacturers might start producing your favorite candies with mocklate! Can you imagine the Hershey tinkering with the kiss? Mars screwing with the M&M? It could happen!

If I were Charlton Heston, I'd be running through the streets screaming, "Chocolate is vegetable oil and milk substitutes!"

But we can stop this dystopic future. All you have to do is send a comment to the FDA telling them not to mess with chocolate. Do it by the deadline of June 25, 2007. To make it even easier, DontMessWithOurChocolate.com guides you through the process, even providing you with a letter you can cut-and-paste into the FDA's comment box (but you should feel free to write your own letter).

Really: it only takes a moment and it's as simple as pie -- a delicious slice of chocolate cream pie, made with genuine chocolate.

Read more about this issue here and here.

Monday, March 26, 2007

Chocolate Haystacks


I'm averse to most low calorie dessert recipes. The majority of them are based on Cool Whip (which I've never been a fan of) mixed with other, powdered stuff.

Peanut Butter "Mousse" = Cool Whip + dehydrated peanut butter.
Oreo Fluff = crushed Oreos + sugar free instant pudding powder + Cool Whip.
This one (scroll down) uses colored Cool Whip as a frosting to top a cake made from a box mix and (I kid you not) a can of diet soda.

If this is the food that's being offered, no wonder people lose weight.

I did find one recipe, however, that isn't too bad: chocolate haystacks. Essentially, you melt 1o oz. of chocolate and use it to coat about 8 oz (a half package) of high fiber cereal. I'm sure that description won't win any fans. Maybe this one will: it tastes like a dark chocolate Kit Kat. (Well, a whole wheat, dark chocolate Kit Kat.) It sates a die-hard chocolate craving. Even kids like it.

So there you have it: a tasty low-cal dessert, with nary a dollop of Cool Whip in sight.

Chocolate Haystacks

10 oz. of chocolate (I used semi-sweet)
1 "sleeve" of high fiber cereal (like Fiber One) - about 8 oz.

Line two baking sheets with parchment paper or aluminum foil.

Place chocolate in a large, microwave safe bowl and microwave for one minute at 40-percent power; stir. Continue microwaving at 30-45 second intervals at 30-percent power until chocolate is completely melted, being sure to stir between intervals.

Once chocolate has melted, add cereal and stir to fully combine. Drop heaping tablespoons of the mixture on to the prepared baking sheets, spacing about an inch apart. Allow haystacks to set before removing them from the sheet; store in an airtight container. Yields approximately 36 haystacks.

Friday, May 26, 2006

Homemade Marshmallows


Remember Martha’s old show, Martha Stewart Living? One day, she showed the audience how to make marshmallows.

That’s the same day I went, “OK. She’s officially lost her mind.”

Marshmallows never seemed like anything but a vehicle for other flavors to me. Dip them in chocolate: delicious. Mix them with butter and Rice Krispies: tasty. Shape them into little chicks and cover them with neon colored sugar ... well, if not great, then at least visually appealing.

But to make them from scratch seemed asinine. What, and put the Jet Puffed people out of business?

But now, years later, I find that marshmallows are no longer the understudy; they’re the star. Gourmet versions are popping up all over the place and, let’s face it, those damn snowflake ones Martha floats in her hot cocoa are attractive.

So here I am, making marshmallows.

It’s not a hard recipe, just time consuming. Like fudge, you have to cook the sugar over low heat until the crystals dissolve, washing down the sides of the pan with a damp pastry brush from time to time. That took a loooong time, but perhaps that’s because I cooked it over very low heat.

Once dissolved, the heat gets cranked up and you wait for the temp to hit 245-degrees F. Again, time consuming but not hard.

From there, the syrup is poured into the gelatin. Once that happens, a scent, not unlike wet dog, is released. (Hot wet dog. Like when your dog goes in the lake on a really humid day and, on the drive home, that damp musky smell stinks up the whole car.) Fortunately, after 15 minutes of whisking at high speed, the smell dissipates and you’re left with something akin to Marshmallow Fluff. I’m guessing that if you took that mixture and put it into an airtight container, it would remain soft. (I would have set a bit aside to experiment with that idea, but the thought occurred after I was finished.)

The cream poured fairly easily into a (disposable aluminum) pan with the help of a rubber spatula. I didn’t press it down with my hands; the spatula (sprayed with cooking spray) did a fine job smoothing out the top. Then, I sprinkled the top with powdered sugar and waited.

The next day they were ready to cut and eat. I found the cut sides to be a bit sticky, so I threw several in a paper bag with some powdered sugar and shook them. The sugar adhered to the sticky sides.

And the taste? Eh. They’re still marshmallows. They're fresher and less artificial-tasting than those you buy at the store, but in the end, nothing really special. They are good covered in chocolate -- melt in your mouth tender -- but most marshmallows taste good in chocolate anyway.

From a culinary perspective, I don't I see the point in making them from scratch. But as a science experiment, it is kind of neat.


Homemade Marshmallows

2 1/2 Tbsp. unflavored gelatin
1 1/2 c. granulated sugar
1 c. light corn syrup
1/4 tsp. salt
2 Tbsp. pure vanilla extract
Confectioners' sugar, for dusting

Combine gelatin and 1/2 cup cold water in the bowl of an electric mixer with whisk attachment. Let stand 30 minutes.

Combine granulated sugar, corn syrup, salt, and 1/2 cup water in a small heavy saucepan; place over low heat, and stir until sugar has dissolved. Wash down sides of pan with a wet pastry brush to dissolve sugar crystals.

Clip on a candy thermometer; raise heat to high. Cook syrup without stirring until it reaches 244-degrees F. (firm-ball stage). Immediately remove pan from heat.

With mixer on low speed, slowly and carefully pour syrup into the softened gelatin. Increase speed to high; beat until mixture is very thick and white and has almost tripled in volume, about 15 minutes. Add vanilla; beat to incorporate.

Generously dust an 8-by-12-inch glass baking pan with confectioners’ sugar. Pour marshmallow mixture into pan. Dust top with confectioners’ sugar; wet your hands, and pat it to smooth. Dust with confectioners’ sugar; let stand overnight, uncovered, to dry out. Turn out onto a board; cut marshmallows with a dry hot knife into 1 1/2-inch squares, and dust with more confectioners' sugar. Makes about 40


Grade: C (not really bad but what’s the point?)

This marshmallow was redeemed by chocolate.

Sunday, March 26, 2006

Ah! Fudge


Ah! Fudge.

Sadie the stepdaughter sampling sweets.


Read the recipe here.

Two things about fudge: 1) it's notoriously difficult to make 2) I've never made it before. Recipe ... for disaster! (Cue musical sting.)

But this month's Martha Stewart Living, which calls like a culinary siren,
had a fudge recipe replete with "money shots": a pile of it on a cake plate, a feminine hand stirring the molten mixture, an assortment of add-ins positioned just so.

"If you can make it without it crystalizing," said Carolyn, the same Carolyn mentioned below, "I'll buy your recipe, pans, butter, mixer and anything else you use to make the damned stuff." Everyone she knew had given up on making "real fudge" (her words) in exchange for the Marshmallow Fluff fudge recipe.

A challenge. I could get fudge and cash out of this? Hey, I'm in.

The recipe I used was not the one in the magazine but one I'd found on the website (for a boring reason*). They're fairly similar (they both yeild fudge...): one has cream, the other butter; one uses chocolate and cocoa, the other, solely chocolate.

I took the opportunity to buy to some chocolate products I've been jonesing for: Scharffen Berger's 99% Cacao Unsweetened and Ghirardelli's Unsweetened Cocoa. They're not what you would call cheap (I paid $10 for under 10 oz. of Scharffen Berger) but if I was going to make fudge, I was going for the gold.

I've used Ghirardelli in the past and been happy with the results, but wasn't as sure about the S.B. Though it has a great reputation, I've also heard people say it's bitter. Nobody wants bitter fudge.

While prepping, I tasted an S.B. shaving -- much smoother than expected. The aroma is wonderful -- deep, rich, and alluring -- so much so that I took another taste. (On the other hand, after sampling the S.B., Sadie ran from the room shouting "Water! I need WATER! Waaaaaaaaaaaaterrrrrr!" So I guess the lesson here is that 7 year olds don't like unsweetened chocolate.) I won't be snacking on the 99% Cacao anytime soon, but it's a great baking chocolate choice.

This is a recipe in which I HAD to have mise en place -- not my usual M.O. (I'm a disorganized, messy cook). But no mise en place = crappy confection.

I won't say this recipe is hard, but it does require precision. (Well, sort of. More about that in a minute.) There's no way I could have made it without a candy thermometer and I watched it like a hawk.

I could have used a bit more information in the website recipe (the magazine's instructions were much clearer; I wish I'd read those as well before proceeding), especially when it came to the phrase "Brush down sides of saucepan with a pastry brush dipped in water to prevent crystallization." Um, when? Before or after the sugar has dissolved -- or both? How much water should I use? Can I ruin the fudge by over-brushing the sides of the pan?

So, I winged it (or, uh, "fudged" it). I kept the pastry brush in a mug of lukewarm water on my range, and violently shook it before wiping the down the sides of the pan (my dog got wet more than once). I probably did this every two minutes while at the stove.

After bringing the mixture to 236-degrees F (soft ball candy stage), I was supposed to pour it into a buttered metal bowl, dot it with small pieces of butter, and let it cool to 110 to 118-degrees F. But I forgot to dot it with butter (whoops). By the time I realized my mistake, the fudge had cooled to 118-degrees. Frantic, I tossed my chilled butter into the microwave for about 45 seconds, figuring I could approximate the effect the molten fudge would have had on the butter. After microwaving, I was left with a mix of melted and softened butter. (Incidentally, the recipe says to pour the hot fudge into a metal bowl, let it cool, and then scrape it into a mixing bowl. Since my Kitchen Aid stand mixer is fitted with a metal bowl, I cut out the middle man by buttering the mixing bowl and pouring the hot fudge directly into it.)

Another issue I had was the mixing time. The recipe says to "beat, stopping occasionally, until fudge keeps its shape when dropped from a spoon and sheen is gone, 3 to 8 minutes." There was no way my fudge was going to do that in 8 minutes. let alone 3. It took me at least 13 minutes to achieve that stage, all the while worrying that somehow, I was going to screw things up.

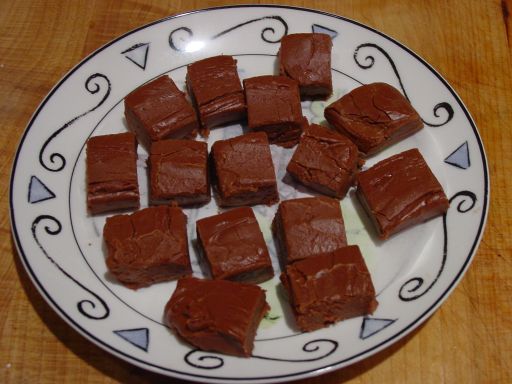
I did not. The fudge came out extremely well, though I'm chalking that up to beginner's luck. Sadie nearly exploded after tasting it (her first taste of fudge ever) and now she won't stop asking for it. (This was flattering for the first 10 minutes... I can't really blame her though; who doesn't crave chocolate, sugar, and butter?) It's lighter than I expected it to be; I imagine the milk and butter mitigated the cocoa and chocolate's darkness. It is very rich, as fudge should be, and extremely tempting.

Carolyn was impressed. She still hasn't paid me though, the welcher.

Next time, I'll throw in some nuts. I'd also like to try the Fluff fudge recipe and see how it measures up.

Grade: A (with nuts, I'm guessing A+)


*Here's why: efficiency. After I'd finished teaching Business Communications, I was going to pick the kids up from school, and head straight to the grocery store. Before doing that, however, I needed to find out what ingrediants I needed; I found this fudge recipe before I came across the one in this month's MSL. See? Boring.