Showing posts with label Beef. Show all posts

Tuesday, March 16, 2010

Beef & Irish Draught Stew

Alas, no picture for this as we -- and 15 other friends -- gobbled this up too quickly. Also, it's hard to photograph stew in an attractive fashion; I mean, have you tried recently? It comes out looking, literally, like a hot mess.

Looks aside, I can assure you it's a delicious stew that tastes even better the next day.

So if you can get a jump on this tonight, you'll have the perfect St. Patrick's Day dinner tomorrow. But, still: if you make and eat this tomorrow, you'll be very happy.

Serve over heaps of hot mashed potatoes and drink with a good Irish beer.

Beef & Irish Draught Stew (source)
2 pounds lean beef stew meat
3 tablespoons vegetable oil, divided
2 tablespoons all-purpose flour
freshly ground black pepper to taste
1 pinch cayenne pepper
2 large onions, chopped
1 clove garlic, crushed
2 tablespoons tomato paste
1 1/2 cups Irish draught beer (I used Guinness because it's St. Patrick's Day - duh.)
2 cups chopped carrot
1 sprig fresh thyme

Toss the beef cubes with 1 tablespoon of vegetable oil. In a ziplock bag, toss together the flour, salt, pepper, and cayenne pepper. Add the beef, seal the bag and shake until the beef is dredged in the flour mixture.

Heat the remaining oil in a deep skillet or Dutch oven over medium-high heat. Add the beef and brown on all sides. Add the onions and garlic. Stir the tomato paste into a small amount of water to dilute; pour into the pan and stir to blend. Reduce the heat to medium, cover, and cook for 5 minutes.

Pour 1/2 cup of the beer into the pan and scrape any bits of food from the bottom of the pan with a wooden spoon. Pour in the rest of the beer, and add the carrots and thyme. Cover, reduce heat to low, and simmer for 2 to 3 hours, stirring occasionally. Taste and adjust seasoning before serving.

Saturday, August 22, 2009

VOTE! VOTE! VOTE!


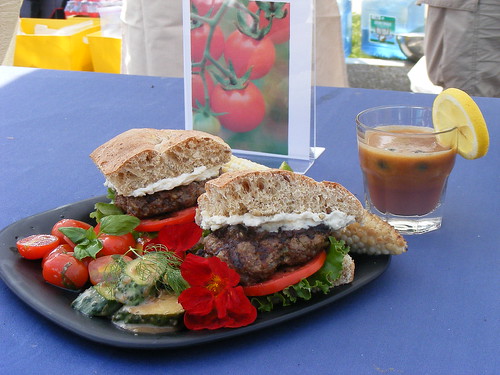
Game ON! Vote for my Finger Lakes Fantastic Onion Burger (and four sides) by clicking here, or send an email to Rebecca@VisitFingerLakes.com with "FLX Ultimate Burger Vote: Laura Kenyon" in the subject line.

Thank you for your support and enjoy the recipes!

Finger Lakes Fantastic Onion Burger

Olive oil
2- 3 garlic cloves, minced (Mullala Garlic)
1 medium onion, diced ( Jones Brook Produce)
Round wholegrain loaf (Kitchen Blessings)
1 lb ground beef from Bedient farms
Salt and pepper
sliced tomatoes (Seneca Vegetables)
Baby arugula or salad greens (Ambrosia Acres Family Farm)
Franjo farms Onion Garlic Asiago spread
nasturtium flowers for plate garnish, optional (Ambrosia Acres Family Farm)

In a small sauté pan, heat olive oil over medium heat. Add onion and garlic and sauté until translucent; set aside and allow to cool to room temp.

Slice bread into four wedges, then slice horizontally to form buns; set aside.

Mix garlic and onion with ground beef; season with salt and pepper. Form four triangular patties (they should be similar in shape to the buns) about ¼-inch thick. Grill over medium-high heat, flipping once, to desired doneness.

While burgers are cooking, lightly brush the insides of the bun with olive oil, and place face-down on grill to toast.

When burgers are ready, place arugula or salad greens and tomato on bottom half of bun. Top with burger, then top with other half of the bun spread generously with Onion Garlic Asiago spread. Garnish plate with nasturtium, if desired.


Quick Pickles
1 pint of pickling cucumbers (Gale-Wyn Farm)
1 bottle of Roasted Garlic/Red Wine Balsamic Vinaigrette (Chef Lerman)
Sprigs of fresh dill (Firefly Farm)

Wash cucumbers and cut on a diagonal into ¼-inch slices; set aside. Heat vinaigrette in a small saucepan over medium heat until it simmers. Add cucumbers, let simmer for a minute and remove from heat. Allow cucumbers to cool until slightly warm; add sprigs of dill and stir to mix. Cool to room temperature or chill before serving.


Height of Summer Tomato and Basil salad
1 pint of grape tomatoes, halved (Gale-Wyn Farms)
Fresh basil cut in a chiffonade (Seneca Vegetables)
Maple Lemon-Lime Basil Vinaigrette (Canadice Kitchens/Sugarbush Hollow)
Salt and pepper to taste

Toss tomatoes, basil, vinaigrette (start with a couple of tablespoons and add more if desired), salt and pepper.

Lime-kissed Fire Roasted Corn
Unshucked ears of corn (Jones Brook Produce)
Lime wedges
Salt and pepper

Heat grill to medium high. Peel back the corn husks, being careful not to remove them completely, and remove the corn silk. Pull the husks back up over the corn so the ear is covered by the husk. If necessary, tie a spare piece of husk around the end of the corn to keep the husk closed.

Place the corn in their husks on the hot grill; cover. Turn the corn occasionally, until the husks are charred on all sides, about 15 to 20 minutes.

Remove corn from grill and allow to sit for 5 minutes. Remove the husks from the corn, and rub the ears with lime wedges. Season with salt and pepper.

Market Fresh Peach Blueberry Lemonade
8 ripe peaches, washed and pitted
2 pints of blueberries, picked over and rinsed
1 whole lemon, rinsed
Honey, to taste

Combine peaches, blueberries, and lemon in a juicer and process. Taste, and adjust sweetness by adding honey if needed. Garnish with a lemon wedge and extra berries.

Friday, July 10, 2009

Grilled Flank Steak with Soy-Chili Glaze


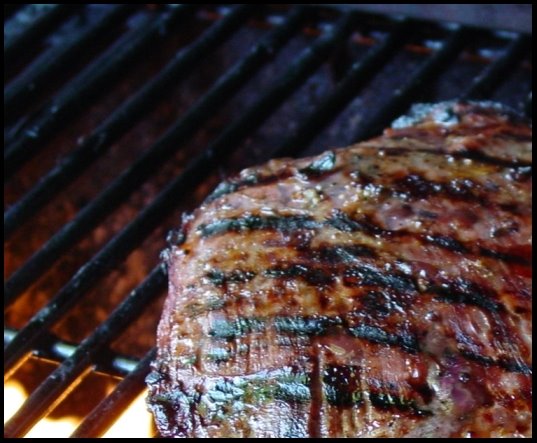
Try to look past the messy composition of this picture, and just stare at the deliciousness of this flank steak. Because it is frickin' amazing.

This steak comes from Bedient Farms, which I can not heap enough praise upon. I don't know what owner Angela Bedient feeds her cows but it must be something fabulous. I think they might actually live like the cows in those Californial cheese commercials.

Speaking of commercials, when you bite into this steak -- well, after you've recovered from the explosion of flavor bursting on your tongue, and after you've regained consciousness from delicious-overload -- that Beef: It's What's for Dinner song will pop in your head and you will remember all that is wonderful about eating beef again.

Grilled Flank Steak with Soy-Chili Glaze (adapted)

1 Tbsp. vegetable oil
1 Tbsp. minced garlic
1 Tbsp. finely grated fresh ginger
1/2 cup soy sauce
1/3 cup lightly packed dark brown sugar
1/2 teaspoon chili powder
2 1/4 pounds flank steak
Salt and freshly ground pepper
Lime wedges

Light a grill or preheat a grill pan. In a small saucepan, heat the oil. Add the garlic and ginger and cook over moderately high heat, stirring occasionally, until the garlic begins to turn golden. Add the soy sauce, sugar and crushed red pepper and cook, stirring, until syrupy, about 3 minutes; let cool.

Season the steak with salt and pepper. Grill the steak for 10 minutes for medium-rare meat, turning once; during the last minute, brush all but 2 tablespoons of the glaze over the steak. Transfer the steak to a cutting board and let stand for 5 minutes.

Thinly slice the steak and brush with the reserved 2 tablespoons of glaze. Transfer to a platter and serve with lime wedges.

Friday, March 27, 2009

Lasagne Verdi al Forno: A Daring Baker Challenge


I really enjoy participating in the Daring Bakers because A) I get to try out recipes that I might not normally be drawn to and B) my skills as a home cook are challenged.

Some challenges are easy for me, and others make me want to run and hide.

I must admit that this month's challenge -- which asked DBers to make pasta from scratch, and create a lasagna using bechamel -- was a run-and-hide challenge.

Why? One: I'm picky about lasagna. Two: I don't have a pasta machine, so rolling out the lasagna would have to be done by hand. Three: I'm not a bechamel fan.

Let me say right here (in case anyone was experiencing recipe related suspense!) that I am so glad to have participated this month. The resulting lasagna was fabulous.

Yes, crafting pasta from scratch without a pasta machine was intimidating. But the dough was beautiful, and surprisingly easy to work with! (And, um, using the dough hook on my stand mixer made bringing the dough together a breeze...) It rolled out nicely and, as long as I kept it lightly floured, did not stick to the board.

Did I get it as thin as I could have? Probably not. Still, the lasagna was lovely, tender, and so much better than dried pasta. And a beautiful vivid green -- perfect for the dawn of Spring!

As for the bechamel, it provided a wonderful rich creaminess to the lasagna. But the most prominent flavor (aside from the oodles of freshly grated Parmesean) was the meaty ragu -- so much depth, so much flavor. (The ragu is slightly adapted from the original recipe.)

After assembling the lasagna, I had about 8 noodles left over, so I spread them with part-skim ricotta (16 oz. total) mixed with chopped fresh parsley, salt and pepper, and rolled the noodles up. I topped all this with an impromptu sauce: I sauteed 6 oz of ground sweet sausage, about two chopped onions and 3-4 cloves of chopped garlic. Then, I added the leftover canned tomatoes from the ragu, and let simmer for 5 -10 minutes to let the flavors meld. In a small casserole dish, I spread a thin layer of the sauce on the bottom, topped it with the lasagna rolls, and smothered them with the remaining sauce. Then, I baked them in a 350-degree oven for 35 minutes, topped the rolls with some shredded mozzarella, and baked for another 5 minutes before serving. Delicious!

All around, this was a great challenge and a delicious recipe. Many thanks to this month's hosts: Mary of Beans and Caviar, Melinda of Melbourne Larder and Enza of Io Da Grande.

Check out all the other DB versions of the recipe at the DBers' new home, The Daring Kitchen.

Lasagne of Emilia-Romagna (Lasagne Verdi al Forno)


The March 2009 challenge is hosted by Mary of Beans and Caviar, Melinda of Melbourne Larder and Enza of Io Da Grande. They have chosen Lasagne of Emilia-Romagna from The Splendid Table by Lynne Rossetto Kasper as the challenge.

(Serves 8 to 10 as a first course, 6 to 8 as a main dish)

Preparation Time: 15 minutes to assemble and 40 minutes cooking time

10 quarts (9 litres) salted water
1 recipe Spinach Pasta cut for lasagna (recipe follows)#1
1 recipe Bechamel Sauce (recipe follows)#2
1 recipe Country Style Ragu (recipe follows)#3
1 cup (4 ounces/125g) freshly grated Parmigiano-Reggiano

Method
Working Ahead:
The ragu and the béchamel sauce can be made up to three days ahead. The ragu can also be frozen for up to one month. The pasta can be rolled out, cut and dried up to 24 hours before cooking. The assembled lasagne can wait at room temperature (20 degrees Celsius/68 degrees Fahrenheit) about 1 hour before baking. Do not refrigerate it before baking, as the topping of béchamel and cheese will overcook by the time the center is hot.

Assembling the Ingredients:
Have all the sauces, rewarmed gently over a medium heat, and the pasta at hand. Have a large perforated skimmer and a large bowl of cold water next to the stove. Spread a double thickness of paper towels over a large counter space. Preheat the oven to 350 degrees Fahrenheit (180 degrees Celsius). Oil or butter a 3 quart (approx 3 litre) shallow baking dish.

Cooking the Pasta:
Bring the salted water to a boil. Drop about four pieces of pasta in the water at a time. Cook about 2 minutes. If you are using dried pasta, cook about 4 minutes, taste, and cook longer if necessary. The pasta will continue cooking during baking, so make sure it is only barely tender. Lift the lasagne from the water with a skimmer, drain, and then slip into the bowl of cold water to stop cooking. When cool, lift out and dry on the paper towels. Repeat until all the pasta is cooked.

Assembling the Lasagne:
Spread a thin layer of béchamel over the bottom of the baking dish. Arrange a layer of about four overlapping sheets of pasta over the béchamel. Spread a thin layer of béchamel (about 3 or 4 spoonfuls) over the pasta, and then an equally thin layer of the ragu. Sprinkle with about 1&1/2 tablespoons of the béchamel and about 1/3 cup of the cheese. Repeat the layers until all ingredients are used, finishing with béchamel sauce and topping with a generous dusting of cheese.

Baking and Serving the Lasagne:
Cover the baking dish lightly with foil, taking care not to let it touch the top of the lasagne. Bake 40 minutes, or until almost heated through. Remove the foil and bake another 10 minutes, or until hot in the center (test by inserting a knife – if it comes out very warm, the dish is ready). Take care not to brown the cheese topping. It should be melted, creamy looking and barely tinged with a little gold. Turn off the oven, leave the door ajar and let the lasagne rest for about 10 minutes. Then serve. This is not a solid lasagne, but a moist one that slips a bit when it is cut and served.

#1 Spinach Egg Pasta (Pasta Verde)

Preparation: 45 minutes

Makes enough for 6 to 8 first course servings or 4 to 6 main course servings, equivalent to 1 pound (450g) dried boxed pasta.

2 jumbo eggs (2 ounces/60g or more)
10 ounces (300g) fresh spinach, rinsed dry, and finely chopped; or 6 ounces (170g) frozen chopped spinach, defrosted and squeezed dry
3&1/2 cups (14 ounces/400g) all purpose unbleached (plain) flour (organic stone ground preferred)

Working by Hand:

Equipment

A roomy work surface, 24 to 30 inches deep by 30 to 36 inches (60cm to 77cm deep by 60cm to 92cm). Any smooth surface will do, but marble cools dough slightly, making it less flexible than desired.

A pastry scraper and a small wooden spoon for blending the dough.

A wooden dowel-style rolling pin. In Italy, pasta makers use one about 35 inches long and 2 inches thick (89cm long and 5cm thick). The shorter American-style pin with handles at either end can be used, but the longer it is, the easier it is to roll the pasta.
Note: although it is not traditional, Enza has successfully made pasta with a marble rolling pin, and this can be substituted for the wooden pin, if you have one.

Plastic wrap to wrap the resting dough and to cover rolled-out pasta waiting to be filled. It protects the pasta from drying out too quickly.

A sharp chef’s knife for cutting pasta sheets.

Cloth-covered chair backs, broom handles, or specially designed pasta racks found in cookware shops for draping the pasta.

Mixing the dough:
Mound the flour in the center of your work surface and make a well in the middle. Add the eggs and spinach. Use a wooden spoon to beat together the eggs and spinach. Then gradually start incorporating shallow scrapings of flour from the sides of the well into the liquid. As you work more and more flour into the liquid, the well’s sides may collapse. Use a pastry scraper to keep the liquids from running off and to incorporate the last bits of flour into the dough. Don’t worry if it looks like a hopelessly rough and messy lump.

Kneading:
With the aid of the scraper to scoop up unruly pieces, start kneading the dough. Once it becomes a cohesive mass, use the scraper to remove any bits of hard flour on the work surface – these will make the dough lumpy. Knead the dough for about 3 minutes. Its consistency should be elastic and a little sticky. If it is too sticky to move easily, knead in a few more tablespoons of flour. Continue kneading about 10 minutes, or until the dough has become satiny, smooth, and very elastic. It will feel alive under your hands. Do not shortcut this step. Wrap the dough in plastic wrap, and let it relax at room temperature 30 minutes to 3 hours.

Stretching and Thinning:
If using an extra-long rolling pin work with half the dough at a time. With a regular-length rolling pin, roll out a quarter of the dough at a time and keep the rest of the dough wrapped. Lightly sprinkle a large work surface with flour. The idea is to stretch the dough rather than press down and push it. Shape it into a ball and begin rolling out to form a circle, frequently turning the disc of dough a quarter turn. As it thins outs, start rolling the disc back on the pin a quarter of the way toward the center and stretching it gently sideways by running the palms of your hands over the rolled-up dough from the center of the pin outward. Unroll, turn the disc a quarter turn, and repeat. Do twice more.

Stretch and even out the center of the disc by rolling the dough a quarter of the way back on the pin. Then gently push the rolling pin away from you with one hand while holding the sheet in place on the work surface with the other hand. Repeat three more times, turning the dough a quarter turn each time.

Repeat the two processes as the disc becomes larger and thinner. The goal is a sheet of even thickness. For lasagne, the sheet should be so thin that you can clearly see your hand through it and see colours. Cut into rectangles about 4 by 8 inches (10 x 20 cm). Note: Enza says that transparency is a crucial element of lasagne pasta and the dough should be rolled as thinly as possible. She says this is why her housekeeper has such strong arms!

Dry the pasta at room temperature and store in a sealed container or bag.

#2 Bechamel

Preparation Time: 15 minutes

4 tablespoons (2 ounces/60g) unsalted butter
4 tablespoons (2 ounces/60g) all purpose unbleached (plain) flour, organic stone ground preferred
2&2/3 cups (approx 570ml) milk
Salt and freshly ground pepper to taste
Freshly grated nutmeg to taste

Using a medium-sized saucepan, melt the butter over low to medium heat. Sift over the flour, whisk until smooth, and then stir (without stopping) for about 3 minutes. Whisk in the milk a little at a time and keep the mixture smooth. Bring to a slow simmer, and stir 3 to 4 minutes, or until the sauce thickens. Cook, stirring, for about 5 minutes, until the sauce thickens. Season with salt, pepper, and a hint of nutmeg.

#3 Country Style Ragu’ (Ragu alla Contadina)

Preparation Time: Ingredient Preparation Time 30 minutes and Cooking time 2 hours

Makes enough sauce for 1 recipe fresh pasta or 1 pound/450g dried pasta)

3 tablespoons extra virgin olive oil (45 mL)
2 ounces/60g pancetta, finely chopped
2 medium onion, diced
4 ounces/125g pork loin, trimmed of fat

4 ounces/125g mild Italian sausage (made without fennel)
8 ounces/250g beef skirt steak, hanging tender, or boneless chuck blade or chuck center cut (in order of preference)
1 ounce/30g thinly sliced Prosciutto di Parma
2/3 cup (5 ounces/160ml) dry red wine
1 &1/2 cups (12 ounces/375ml) chicken or beef stock (homemade if possible)
2 cups (16 ounces/500ml) milk
3 canned plum tomatoes, drained
Salt and freshly ground black pepper to taste

Working Ahead:
The ragu can be made 3 days ahead. Cover and refrigerate. It also freezes well for up to 1 month. Skim the fat from the ragu’ before using it.

Browning the Ragu Base:
Heat the olive oil in a 12 inch (30cm) skillet (frying pan) over medium-high heat. Have a large saucepan handy to use once browning is complete. Add the pancetta and minced vegetables and sauté, stirring frequently with a wooden spoon, 10 minutes, or until the onions barely begin to color. Coarsely grind all the meats together, including the prosciutto, in a food processor or meat grinder. Stir into the pan and slowly brown over medium heat. First the meats will give off a liquid and turn dull grey but, as the liquid evaporates, browning will begin. Stir often, scooping under the meats with the wooden spatula. Protect the brown glaze forming on the bottom of the pan by turning the heat down. Cook 15 minutes, or until the meats are a deep brown. Turn the contents of the skillet into a strainer and shake out the fat. Turn them into the saucepan and set over medium heat.

Reducing and Simmering: Add the wine to the skillet, lowering the heat so the sauce bubbles quietly. Stir occasionally until the wine has reduced by half, about 3 minutes. Scrape up the brown glaze as the wine bubbles. Then pour the reduced wine into the saucepan and set the skillet aside.

Stir ½ cup stock into the saucepan and let it bubble slowly, 10 minutes, or until totally evaporated. Repeat with another ½ cup stock. Stir in the last 1/2 cup stock along with the milk. Adjust heat so the liquid bubbles very slowly. Partially cover the pot, and cook 1 hour. Stir frequently to check for sticking.
Add the tomatoes, crushing them as they go into the pot. Cook uncovered, at a very slow bubble for another 45 minutes, or until the sauce resembles a thick, meaty stew. Season with salt and pepper.

Friday, July 04, 2008

Red Meat, White Rolls, & Blue Cheese: Blue Cheese Burgers for the 4th of July


Mmmm ... grilled beef, stuffed with melted blue cheese, nestled on a toasted bun loaded with tomato, lettuce, red onion, ketchup and a squirt of Dijon mustard.

It's the most flavorful, satisfying burger I've had in a long, long time. Enjoy and happy Independence Day!

Grilled Blue Cheese Burgers (from Cooking Light)

2 (1-ounce) slices white bread
2 Tbsp. fat-free milk
1/2 tsp. salt
1/2 tsp. black pepper
2 pounds lean ground beef (90-percent lean)
1/2 cup (2 ounces) crumbled blue cheese

Grease grill with oil; preheat grill.

Grind bread in a food processor until finely ground, about 30 seconds. Place breadcrumbs in a large bowl, add milk and toss mixture with a fork to moisten. Add salt, pepper, and beef to breadcrumb mixture, stirring just until combined. Divide meat mixture into 16 equal portions, shaping each into a patty. Spoon a tablespoon of blue cheese into the center one patty and top with another patty, pinching edges to seal. Repeat until you have 8 blue cheese stuffed patties.

Place patties on grill and cook for 4 minutes on each side or until desired degree of doneness. Serve patties on toasted rolls with desired toppings.

Yields 8 burgers.

Monday, April 21, 2008

Sweet Soy-Grilled Short Ribs

Check out my step-by-step instructions for this recipe (with lots of pictures) on Instructables.com.


The weather was so beautiful here on Saturday: bright sunny skies, warm weather (80-degrees in APRIL!), trees and flowers blooming, so we had our neighbors, Chris & Shelly, over for a little barbecue.

How could we not grill up some ribs? Mmm ... ribs.

These guys are sweet and tangy, with Oyster and soy sauces in the glaze helped along by fresh garlic, ginger, and scallions. Everything is enhanced by the grill -- flame-broiled goodness!

Sweet Soy-Grilled Short Ribs
1 cup sugar
3/4 cup Chinese oyster sauce
1/2 cup soy sauce
1/2 cup sake (Japanese rice wine), Chinese rice wine, or dry sherry
3 cloves garlic, minced
1 piece (1 inch) peeled fresh ginger, minced
2 scallions, white parts minced, green parts thinly sliced
About 3 pounds beef short ribs

Slice the short ribs into 1/2-inch pieces. If you can find bone-in short ribs, use them. But if you can only get the boneless variety (which is what happened to me) buy them anyway! Once you've cut the ribs into 1/2-inch portions, place them in a Tupperware container with a tight fitting lid. (This will help with marinating later on.)

In a small mixing bowl, add sugar, oyster sauce, soy sauce, sake (or wine or sherry), garlic, and the whites of the scallions. Whisk or stir with a fork until well blended. Pour the marinade over the ribs, seal container tightly with its lid, and marinate in the refrigerator for 1 to 2 hours. Halfway through your marinating time, flip the container upside down to allow the marinade to penetrate all of the meat. (If you don't have a Tupperware container, simply place the meat in a bowl with the marinade and cover with plastic wrap. Halfway through the marinating time, re-adjust the ribs, moving them around in the marinade for even coverage.)

When ready to cook, preheat your grill to high. Check the heat using the "Mississippi test" -- hold your hand about three inches above the grill grate; when the fire is at the right heat, you should only be able to count two or three Mississippis before you have to pull your hand away. Oil the grill grate (use long tongs to hold an oil-dipped cloth) and place ribs on grill. Cook until the ribs are done to your preference (about 3 to 4 minutes per side for medium) and nicely browned. Your ribs could cook more quickly, or take more time. So KEEP AN EYE ON THEM, especially if you're using the boneless variety of short ribs. When ready, move ribs from the grill to a bowl, platter or plates, sprinkle the scallion greens, serve and enjoy!

Wednesday, September 12, 2007

This Thing About Lasagna

I have always maintained that, if you are an Italian-American from the NY-metro area (and parts of NJ & Conn, too) that you are either in the mafia or know someone who is. (And, for what it's worth, I fall into the latter category. )

I have a similarly sweeping statement about those of Italian descent and lasagna: the version you grew up with is the best there is.

Sure, you might go to a fantastic restaurant, or eat dinner at a friend's who really knows how to cook, but their lasagna, no matter how delicious, just isn't as good as the one you know.

This is how I feel about my lasagna. Yes, I've had other versions -- really delicious versions! -- but they weren't mine, so they weren't the best.

Ironically, the recipe doesn't come from my Dad's (Italian) side, but my mother's (Irish) side. My mom's aunt by marriage (Aunt Ann, who, um, happened to be German) picked up this recipe from her days cooking in a school cafeteria in Queens, NY. This was during the days when cafeterias actually cooked food as one might at home, though on an admittedly larger scale.

I feel a little sheepish admitting this lasagna's pedigree (Irish? German? CAFETERIA?!?) but, who knows -- maybe Aunt Ann got the recipe came from an Italian woman who worked alongside her. Plus, it's a damn fine lasagna.

In any event, I didn't find out this story until I was in college, and by then my love for it had been long cemented. I hope you enjoy it.


Lasagna

This lasagna always tastes better the next day. You may assemble the lasagna a day ahead with stellar results. Leftovers reheat nicely in the microwave, but I like to eat it cold, too.

16 oz. lasagna noodles
1 lb of ground beef
1 medium onion, diced
2 cloves of garlic, minced
Approx 37 oz. of marinara sauce (if using jarred sauce, this is typically 1 and 1/3) plus a little more for the baking dish & top of the lasagna
2 lbs of ricotta cheese
8 -12 oz. mozzarella cheese, shredded

Preheat oven to 375-degrees F. Cook pasta per package directions, being careful not to overcook. Drain, then place back in the pot adding cold water to stop cooking process and prevent the pasta from sticking together.

While the pasta is cooking, in a large frying pan, brown the ground beef over medium, removing cooked meat with a slotted spoon to a small bowl. Drain all but 1 1/2 TBS of fat from the pan. Add onion, cooking until translucent. Toss in minced garlic and cook briefly. Put meat back in pan, mix well, then add in sauce.

Drain pasta well (I use my index and middle fingers as a squeegee to help get rid of excess water). In the bottom of a 9x13 baking dish, spread a bit of the reserved marinara sauce, then lay down the first layer of lasagna, overlapping the edges. Add a layer of the meat sauce (about 1/3), spreading well to cover the noodles. Add the ricotta (again 1/3 of the total) dropped from a tablespoon in an even but random pattern. Top this off with a scattering of mozzarella cheese (about 1/4 the total amount). Repeat this process two more times, layering the lasagna in alternate directions and tucking in the edges, until complete. Top the final "uncovered" layer with lasagna noodles, and lightly cover with marinara sauce. Cover with foil and bake for 30 minutes, or until hot in the center. Remove foil, sprinkle with additional mozzarella cheese, and bake another 5 minutes. Let stand for 5 to 10 minutes before serving.

Depending on how you slice it, this serves 8-12. (I usually slice it for 12.)

Friday, August 24, 2007

Grilled Flank Steak with Corn, Black Bean and Avocado Salad


I'm still shocked this is a Weight Watchers recipe: it's casually elegant, tasty, and there's nary a "diet substitution" in sight. I can't say I detected the garlic or lime flavors on the beef, yet it remained tasty. And the salad is terrific, fresh and flavorful. For an added dimension of flavor, I roasted the corn in the oven for 45 minutes at 450-degrees F, then cut off the kernels after it had cooled.

Grilled Flank Steak with Corn, Black Bean and Avocado Salad

Ingredients
1 pound raw lean flank steak
1 medium garlic clove(s), peeled and smashed with side of a knife
1 tsp fresh lime juice
1/8 tsp table salt
1/8 tsp black pepper, freshly ground

Salad
1 Tbsp jalapeno pepper(s), minced (do not touch seeds with bare hands)
1 small corn on the cob, cooked, kernels removed
1/2 medium avocado, peeled, pitted and diced
1 cup canned black beans, drained and rinsed
4 tsp fresh lime juice
2 Tbsp cilantro, fresh, minced (optional)
1/8 tsp table salt
1/8 tsp black pepper


Preheat grill to medium hot.

Score steak on one side by making shallow crisscross slashes with a sharp knife; rub garlic over cut surface of steak. Brush steak with lime juice and season with salt and pepper; set meat aside for 10 minutes to allow meat to absorb flavors.

Meanwhile, combine salad ingredients in a medium bowl; stir gently and set aside.

Grill flank steak for 5 minutes on first side; flip and grill until well-browned on outside and medium-rare inside, about 5 to 6 minutes more. Immediately remove steak from grill and set aside on a clean plate for 5 minutes for meat to reabsorb juices. Thinly slice steak across grain and serve with salad. Yields about 3 1/2 ounces of steak and 1/2 cup of salad per serving.

Wednesday, June 20, 2007

Balsamic Marinated Skirt Steak

On the grill.

It's dishes like this that remind me why I love beef. So tender, so flavorful -- sweet and a little smoky, all anchored by the umami flavor of the steak. It's amazing. For a perfect meal, all this needs is a little side salad (maybe a classic iceberg with a drizzle of blue cheese dressing) and perhaps some corn on the cob.

On the plate.

One note: I cooked up 12 oz. and felt 3, 4 oz. servings were quite nice. Using this math, you could get 6 servings, not 4 as the recipe suggests, out of 24 oz. of steak. Having said that, Shane ate two servings.


Balsamic Marinated Skirt Steak
1/2 cup balsamic vinegar
2 tablespoons light-brown sugar
2 garlic cloves, minced
1 teaspoon crushed dried rosemary
Coarse salt and ground pepper
1 1/2 pounds skirt steak, cut crosswise into 4 equal pieces
Oil for grates

In a resealable plastic bag or shallow dish, combine vinegar, sugar, garlic, rosemary, 1 teaspoon coarse salt, and 1/2 teaspoon pepper. Pierce meat all over with a fork; add to marinade, and turn to coat. Let marinate at room temperature at least 15 minutes, or cover and refrigerate up to 1 day.


Heat grill to high; oil grates. Remove steaks from marinade, allowing excess to drip off. Grill steaks 2 to 4 minutes per side for medium-rare. Transfer to a plate; cover loosely with aluminum foil, and let rest 5 minutes. Serves 4.

Monday, November 06, 2006

Retro Recipe Challenge #4: Poppin' Fresh Barbecups


How to put this delicately ... sometimes in a woman's life -- or should I say month -- she craves some high-fat, low-in-pretention food. With no one to answer to except a pet, a kick-ass cable package, and a long historical tell-all, she's free to make what she wants.

Cap'n Crunch is an option, but runs the risk of palate abrasion. Mountains of leftover holiday candy would fit if she hadn't already OD'ed on it. But bread, beef and cheese could work nicely.

It's doubtful that Peter Russell, 1968 Pillsbury Bake-off contest winner, could identify with the above sentiments, but his recipe -- the kitschily titled "Poppin' Fresh Barbecups" -- certainly speaks to it. Peter took some BBQ sauce, onion, and brown sugar, mixed it with ground beef and stuffed it into cup-shaped biscuits, and topped it all off with cheese.

If that doesn't appear to be a recipe for hormonal happiness, I'm not sure what does. (Other than chocolate cake with chocolate frosting, drizzled with chocolate sauce.)

Sadly, 2006 sensibilities found Peter's recipe a bit bland. More onion, BBQ sauce and some spices (cayenne, cumin) would kick up things up.

Still, all the fat does sate one's hormonally-addled appetite.

Poppin' Fresh Barbecups

1 lb. lean ground beef (responsibly raised)
1/2 cup barbecue sauce
1/4 cup chopped onion
1 to 2 tablespoons brown sugar
1 (12-oz.) can Pillsbury® Golden Layers® Refrigerated Buttermilk or Flaky Biscuits
2 oz. (1/2 cup) shredded Cheddar cheese

Heat oven to 400-degrees F. Grease 10 medium muffin cups. In large skillet, brown ground beef over medium heat until thoroughly cooked, stirring frequently. Drain. Stir in barbecue sauce, onion and brown sugar. Cook 1 minute to blend flavors, stirring constantly.

Separate dough into 10 biscuits. Place 1 biscuit in each greased muffin cup. Firmly press in bottom and up sides, forming 1/4-inch rim over edge of cup. (Mine didn't get quite that far -- LR) Spoon about 1/4 cup beef mixture into each biscuit-lined cup. Sprinkle each with cheese.

Bake for 10 to 12 minutes or until edges of biscuits are golden brown. Cool 1 minute; remove from muffin cups.

Grade: B-

Wednesday, October 25, 2006

Meatloaf with Chili Sauce

See those mashed potatoes? The recipe is a'comin.


The day I made this recipe, it tasted pretty good. The next day, it was fantastic. So make it a day ahead, reheat, and enjoy with abandon!

This recipe makes two loaves or, for a kid-friendly twist, put the mixture into 24 muffin cups.

Meatloaf With Chili Sauce

1/2 c. milk
4 slices white sandwich bread, torn into pieces
1 1/2 lbs ground sirloin
1 1/2 lbs ground pork
2 small onions, finely chopped
6 garlic cloves, minced
1/2 c. chili sauce, plus 1/4 cup for glaze
1 c. chopped fresh parsley
1/2 c. grated Parmesan cheese
2 large eggs, lightly beaten
Coarse salt and freshly ground pepper

Preheat oven to 350-degrees F, with rack in center. In a large bowl, pour milk over bread; let soak, about 30 seconds. Add sirloin, pork, onion, garlic, 1/2 cup chili sauce, parsley, Parmesan, eggs, 1 1/2 teaspoons salt, and 1/2 teaspoon pepper. Using your hands, mix until combined; do not overmix or meatloaf will be dense.

Divide mixture in half. Gently pat each half into a log, and place each log in an 8 1/2 -by-4 1/2-inch loaf pan. Do not press down or into corners.

Bake 50 minutes. Brush tops of loaves with remaining 1/4 cup chili sauce; continue cooking until juices run clear and an instant-read thermometer inserted into thickest part registers 160°, about 10 minutes.

Remove from oven; let rest 5 minutes. Turn loaves out of pans; slice each into eight 3/4-inch-thick slices.

Note: For a loaf with crisp edges, shape the meat mixture with your hands into a log slightly smaller than the pan. And for a light texture, don't press the log into the pan; just drop it in.

Grade: A

Wednesday, October 04, 2006

Beef Stroganoff

Beef Stroganoff: delicious but not photogenic.


More than any other season, autumn pulls me toward the kitchen. Maybe it's because so many of the things I love -- spiced desserts, hearty dinners, rich wines -- feel synonymous with fall.

Beef Stroganoff is a perfect comfort food after a long and chilly day. The beef, cut into hefty chunks, is flavorful, the mushrooms are tantalizing, the noodles are simple and delicious.

I came very close to adding some red wine but, never having made Stroganoff before, I wanted to try it without. It's delicious as is, but a splash of good red would be wonderful, too.

I don't remember what cut of beef I used as I picked up what was available from Laura's Lean Beef. I'd think any cut that doesn't require long braising would work. The cut I purchased was a bit thicker than the recipe calls for, so I slipped it into a ziplock bag and pounded it until the meat was 1/4-inch thick.

Just a little background info from Epicurious.com:
This Russian dish has been around for several centuries, but it wasn't until the fifties that it became all the rage in the United States (despite our fear of Communism).
Retro food strikes again!

Beef Stroganoff (From Everyday Food)

1 lb. beef tenderloin or trimmed rib-eye recommendedd: Laura's Lean Beef
Coarse salt and ground pepper
3 Tbsp. canola oil
1 medium onion, thinly sliced
1 lb. white mushrooms, sliced 1/2 inch thick
1 c. reduced-sodium beef broth
1 Tbsp. Dijon mustard
1/2 c. sour cream
Chopped fresh dill, for garnish (optional)
Egg noodles, cooked and kept warm.

Slice beef into 2-inch-long strips, each about 1 inch wide and 1/4 inch thick. Season generously with salt and pepper. Heat 2 tablespoons oil in a large skillet over high heat. Brown meat in two batches, about 1 minute per side; remove from skillet, and set aside.

In same skillet, heat remaining tablespoon oil over medium heat. Add onion; cook, stirring occasionally, until lightly browned, 5 to 7 minutes. Add mushrooms; cover. Cook until just tender, 6 to 8 minutes. Add broth; simmer, uncovered, until liquid has thickened, 6 to 8 minutes.

Stir mustard into mushroom mixture in skillet. Return beef to skillet; cook over medium-low heat until heated through, 1 to 2 minutes. Remove from heat, and stir in sour cream. Season with salt and pepper, as desired. Serve immediately over egg noodles, and, if desired, garnish with chopped dill.

Grade: A

Friday, September 15, 2006

Faux-sagna


It was cool and rainy yesterday, making me crave comfort food. That weather also makes me feel kind of lazy, so while I wanted lasagna for dinner, I couldn’t bear the thought of finger-wiping noodles (to rid them of excess water) and laying them in a pan, alternating the direction of each layer.

So I cheated. I boiled up a box of rotini, spread the cooked pasta in a glass dish, topped it with meat sauce, ricotta and mozzarella, and popped it in the oven. 40 minutes later, I had my comfort food.

And it was damned good.

Faux-sagna (aka, rotini lasagna)

1 lb. box rotini
2 jars of good-quality, tomato based pasta sauce (recommended Newman’s Own Sockarooni
1 lb. organic or responsibly raised ground beef (like Laura's Lean Beef)
32 oz. part-skim ricotta cheese
4 cups shredded mozzarella
Pecorino Romano

Preheat oven to 350-degrees F. Lightly grease a 9x13 glass pan. Cook rotini according to package directions. While rotini is cooking, heat a large sauté pan to medium high and cook beef until brown. Reduce heat to low and add 1½ jars of sauce to the beef in the pan. Stir until sauce is heated through.

When pasta is cooked to al dente, drain well. Spread a thin layer of the non-meat sauce (the sauce still in the jar) in the bottom of the pan. Top with a layer of rotini, followed with meat sauce. Drop heaping spoonfuls of ricotta on top of the sauce, followed by mozzarella. Repeat with another layer of rotini, meat sauce, ricotta, and mozzarella. Top with the last of the rotini and non-meat sauce.

At this point, you should have three layers of rotini sandwiching two layers of meat sauce, ricotta, and mozzarella.

Lightly grease a piece of aluminum foil and place the greased side down on top of the pasta. Crimp foil and place pan in oven. Bake 35 minutes or until the sauce is bubbling. Remove foil, top with more mozzarella and some Pecorino Romano and bake another 5 minutes.

Grade: A

Friday, August 25, 2006

Orange Beef Stir-Fry

[Note: if you're just interested in the recipe, skip down a several paragraphs. This one's got quite the preamble.]

Here's a dirty little secret: I'm obsessed with P.F. Chang's Orange Peel Shrimp. Love, love, looove it. I love it so much that I can almost forget that:

The only P.F. Chang's around is attached to a mall (a hallmark of fine dining, to be sure),

That all the mixed drinks have cutsey names (even though I also really like "“The Poolside"),

That the cuisine is only vaguely Asian (I suspect two guys named Peter and Frank randomly pointed a finger at a name in a Chinatown phonebook), and

That the waitstaff have, on occasion, made me very uncomfortable.

Which happened the other day. I was shopping for linens at the Eastview mall, now a mere 15 minutes from my home. It was around 1 pm and I was hungry, so I knew where to go. Seated, I settled in with my copies of People and Us magazine (dining in a mall requires such reading fare) waiterhe waite came over.

"David" was very attentive. Attractive, but not overly so. And especially charming yet smarmy, in that I'm-a-20-year-old-guy-and-I-think-I've-got-the-world-by-the-balls-but-I'm-just-one-broken-date-with-a-Hooters-waitress-away-from-severe-depression sort of way.

Before I continue, I should note two things: 1) I was the only person in the restaurant eating alone (which I like to do on occasion), and 2) I happened to be wearing a low-cut shirt (although not as revealing as others I've seen).

David did not leave me alone. He kept coming back, making little jokes, bringing me more iced tea than necessary, making sure the fortune cookies were up to snuff; the whole nine yards. When he asked how I'd like the complementary side sauce -- mild, medium, or hot -- and I said "hot," he waggled his eyebrows. "Ahhh," he said, "haaahhhhhht."

Now here's the thing: I couldn't figure out if he was acting this way because he thought a) he'd get a better tip, b) I was looking to be ogled, or c) it was sad I was eating alone. If I knew the specific reason, I could have chosen a particular response. But as it stood, I just smiled vaguely, laughed politely at a few jokes, and tried to put my magazine in front of my face.

It was enough to put me off my meal - the damned shrimp didn't taste as good.

So I got home and thought, "How hard can it be to make this?"

Well, kind of hard. The recipe itself isn't difficult, but nailing the flavor is. I substituted organic beef (I missed you, cow) for a little variety and combined a couple of Martha recipes to form the one below. It's not a bad recipe, it's just not a replica of P.F. Chang's orange peel sauce.

It has a nice, fresh quality. You know, unlike the P.F. Chang version.

Orange Beef Stir-fry
1 cup brown rice
3 oranges
2 garlic cloves, minced
1 tablespoon rice vinegar
1 tablespoons soy sauce
1 1/2 pounds trimmed boneless sirloin or rib eye, cut into 1/2-inch-thick strips
1 tablespoon cornstarch
1 to 2 tablespoons canola oil
1 pound broccoli florets, broken into small pieces
1 cup water
Palmful chopped scallions, green parts only
Red pepper flakes

Cook rice according to package instructions; set aside. Into a small bowl, finely grate zest and squeeze juice from 1 orange. Add garlic. vinegar and soy sauce; set aside. In a medium bowl, toss beef with cornstarch; season with salt and pepper. Set aside.

In a large skillet, combine broccoli with water; season with salt and pepper. Bring to a boil over medium-high; cook, partially covered, until broccoli is bright green and crisp-tender, 4 to 6 minutes. Transfer to a plate. Discard any water in skillet; wipe with paper towel.

In same skillet, heat oil over high. When pan is very hot, add half the beef; cook until browned, 2 to 4 minutes. Using slotted spoon, transfer beef to a separate plate. Repeat with remaining oil and remaining beef, but leave beef in skillet.

Return reserved beef to skillet, add orange-juice mixture and continue cooking over high heat until sauce thickens, 2 to 4 minutes.

Place rice on a serving platter and top with broccoli. Spoon beef and orange mixture on top, sprinkling with scallions and red pepper flakes. Serves 4.

Grade: B+

Tuesday, May 30, 2006

Marinated Flank Steak


In the Northern Hemisphere, summer is upon us. Get your ass outside, build a big fire, and grill some meat.

This is The Martha's recipe. She offers so many good things to eat, like this marinated flank steak. (Your marshmallows, Martha, I could do without.)

I completely forgot to make the sauce, seasoning the final result with salt and pepper (and, depending on the bite I was taking, a little basil garlic butter). Delicious.

Marinated Flank Steak

6 garlic cloves, minced
Coarse salt and ground pepper
1 quart apple juice
¼ cup whiskey or scotch (optional)
2 Tbsp. whole-grain mustard (I used a whole-grain Dijon)
2 Tbsp. olive oil, plus more for grates
1 Tbsp. Worcestershire sauce
2 tsp. hot sauce, such as Tabasco
2 flank steaks (about 1 ½ pounds each), pricked all over with a fork

In a 9-by-13-inch baking dish, whisk together garlic, 1/2 teaspoon each salt and pepper, apple juice, whiskey (if using), mustard, oil, Worcestershire, and hot sauce. Add steaks, and turn to coat; marinate at room temperature, turning occasionally, for an hour, or cover with plastic wrap and refrigerate up to a day.

Lift steaks from marinade onto a platter; set aside. Make sauce: Place marinade in a large saucepan and bring to a boil over high heat. Cook until thickened and reduced to about 1 cup, 20 to 25 minutes. Season with salt and pepper.

Meanwhile, heat grill to high; lightly oil grates. Place steaks on grill. Cook, turning once, until well browned and cooked to desired doneness, 6 to 8 minutes per side for medium-rare (130 to 135 degrees on an instant-read thermometer.

Transfer steaks to a cutting board and tent with aluminum foil. Let rest 10 minutes before thinly slicing against the grain. Serve with sauce.
Serves 8.

Grade: A

Saturday, May 06, 2006

Burgers and Baked Onion Rings


Sometimes you have such high hopes for a meal. You go to the store, carefully select your ingredients, get home, set up your mise en place, and cook.

And then, when everything is in front of you, and you take your first bite – well sometimes it’s great, and sometimes it’s not, and some it’s OK.

This is OK. We’re full and sated but not jumping through the roof with joy.

With the burgers, I didn’t make the patties thin enough so between that and the very high flame, they didn't cook evenly.

I’d like to try this recipe again – the flavor was good, but as they were well done, I’m sure they could be better. (They remained moist.) I always have trouble grilling meat. I need to get an instant read thermometer.

***

I love onion rings. FRIED onion rings.

For what they are, they’re good. But baked onion rings will never be mistaken for the real thing. I guess it isn't fair to compare them to fried -- they're not in the same league. (Baked = minors. Fried = majors.)

Having said that, the ones Michael Chu at Cooking for Engineers made look a lot better than mine, so perhaps something went awry for me.

I'm not going to bother with these again. For the amount of effort, the results aren't worth it.

Both recipes come from Cook's Country magazine.

The Ultimate Burger

8 strips bacon
1 to 2 slices of white bread, crusts removed & discarded, cut into ½-inch pieces
¼ cup milk
1-1/2 lbs. ground beef (85 to 90-percent lean)
1 tsp. salt
½ tsp. pepper
2 large garlic cloves, very finely minced
Veggie oil for grill rack

Fry bacon in a large skillet over medium heat until crisp, 8 minutes. Transfer bacon to plate lined with paper towels. Save bacon for another purpose. (Bacon bits for salad? Topping your burger for extra burger goodness?) Spoon 3 Tbsp. bacon fat into heatproof bowl in refrigerator until ready to use.

Place bread in small bowl and add milk, allowing mixture to sit for 5 minutes. Using a fork, mash bread and milk until if forms a smooth paste.

Break up beef into small pieces in medium bowl. Season with salt and pepper, then add garlic, bread paste, and bacon fat. Lightly knead together so that ingredients are well incorporated and mixture forms cohesive mass. Divide meat into 4 equal parts. Using hands, toss each portion of meat back and forth to form a loose ball, then gently flatten into ¾-inch patties.

Oil grate and grill burgers over very hot fire, without pressing down on them, until well-seared on both sides, 7 to 10 minutes. Serves 4


Oven-Fried Onion Rings

30 saltine crackers
4 handfuls kettle-cooked chips
2 med. Yellow or Vidalia onions cut into 1/2-inch wide rings
¼ c. flour
½ cup buttermilk
1 large egg
¼ tsp. cayenne pepper
½ tsp. salt
¼ tsp. pepper
¼ c. flour
2 Tbsp. veggie oil

In a food processor, process saltines and potato chips to the size of your choosing (play it safe and don’t go to big or small).

Combine the buttermilk with 1/4 cup flour, cayenne pepper, egg, salt, and pepper to form batter.

Preheat oven to 450-degrees F. Take each onion ring and drop it into the flour, tapping off the excess. Then drop the ring into the buttermilk batter. Lift the ring out of the buttermilk (you use a chopstick or kebab skewer) and place it into the saltine-chip mixture. Spoon the coating around the ring until it's well coated and then lift it (using another chopstick or skewer) to a plate. Repeat until all the rings are gone or you get bored with the process, which ever comes first.

Pour oil onto baking sheet and place in the oven for 8 or 9 minutes. Carefully pull out the pan - it should be lightly smoking - and tilt it so the surface is evenly coated with oil. Placed onion rings onto the pan, making sure none are touching, and bake for 8 to 10 minutes. Pull out the pan, flip all the rings over and bake for another 8 to 10 minutes. When finished, both sides should be golden brown.


Burger: B (With better grilling techniques, A range)
Baked Onion Rings: B- (ketchup helps...)


Tags: , , , , , , , , , ,

Sunday, March 19, 2006

Corned Beef, Cabbage & Potatoes

Photo-illustration courtesy of Google Image Search. I forgot to take a picture of our corned beef dinner before we ate it. Oops.

While St. Patrick's Day was this past Friday, we ate corned beef, cabbage, and potatoes today. (We had friends over for dinner on Friday who don't eat beef, so I baked up some fish and chips. Don't be impressed -- I bought them frozen at BJ's).

The thing I love about corned beef is that it's dead simple to make; it doesn't even merit an actual recipe.

Place your corned beef in a large pot and cover with cold water. Cover the pot with a lid and bring to a boil. Reduce heat to a simmer and cook corned beef until tender, about 50 minutes per pound. (My corned beef was 3.5 pounds, so I cooked it for about 3 hours.)

When your corned beef is tender, toss in some potatoes (I cut up red potatoes to speed up the cooking) and cook until almost tender. At this point, remove the corned beef and cover with foil, allowing it to rest for approximately 20 minutes.

With the potatoes, toss in a head of cabbage, chopped into thin wedges and cook until tender (I like it a bit crunchy).

When ready, drain the potatoes and cabbage and toss with butter. Serve with corned beef slices cut against the grain. You'll probably want to sprinkle the cabbage and potatoes with salt and pepper and eat the corned beef with a spicy mustard (like Gulden's -- save the wussy flavor of French's for another dish).


Grade: A+


UPDATE: A great way to reheat leftover corned beef is to simmer it in beer. As for the potatoes and cabbage, just pop them in the microwave. Dinner in a flash!