Thursday, March 30, 2006

Yet More Peeps


I found the elusive white peeps last night -- still no idea on what to do with any of them.

I may have to do this:

I have to make dessert for a luncheon on Sunday, anyway; peep-topped cupcakes would probably go over well with the kids. But it doesn't seem that fun.

Of course, I could also make a
Peep Waldorf Salad. Disgusting, but different...

Tags:
, , , , , , ,

New Banana Cake with Chocolate Butter Frosting

“A Butter icing is like a favorite cotton dress…simple and easy to put on…cooked white frosting like a perky street ensemble…and the extra touches of tinted coconut, toasted nuts, or allegretti are the gay accessories that make a costume ‘special.’ Your family will enjoy your ‘dressed-up’ cakes the more because they look so pretty.”
– Betty Crocker, "Betty Crocker’s Picture Cook Book" page 161


I had some very spotted bananas I planned to make spicy banana bread with, but I was missing a key ingrediant (orange juice), so that was out. After some digging, I came across the “New Banana Cake” recipe from Betty Crocker’s Picture Cook Book, first published in 1950. If you haven’t seen this, take a look –- it is a faithful reproduction, down to its sexist take of cooking and gallery of regrettable food-like pictures.

The cake was very easy to make. Having said that, the recipe was difficult to follow (at least to 2006 sensibilities), so I typed it out before proceeding (that’s what you see below).

To go with the cake, I chose the book’s Chocolate Butter Icing, which doesn’t use butter but shortening.

Essentially, sweetened Crisco.

I used butter.

I wound up substituting a lot of ingredients, which may be the reason the cake isn’t that great. I was out of sugar, so I used Splenda, there was only 1 ½ cups of cake flour left in the canister, so I added ¾ cup of all purpose flour, and – perhaps most egregious – I replaced the frosting’s cream with non-fat, non-dairy vanilla creamer.

After writing that, I’m surprised this thing was edible at all.

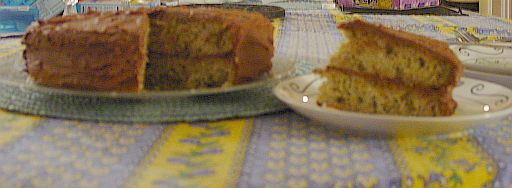
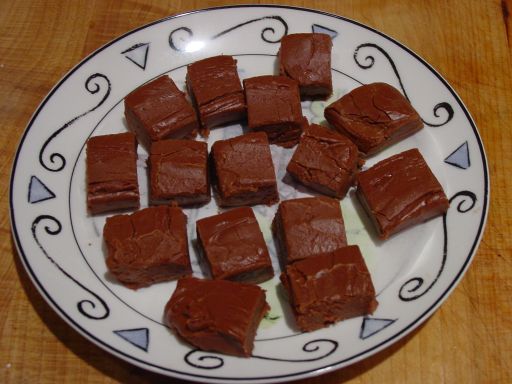
But it was edible, though nothing to write home about. The cake had a strong banana flavor but could have been sweeter; whether that’s the Splenda’s fault is up in the air. The nuts could have been chopped finer, as well. As for the frosting, it’s pleasant with a light cocoa flavor. I used the 99% cacao Scharffen Berger again and now wonder if the reason I can eat straight is because it’s not as intense as it could/should be. You would think it would result in a dark chocolate flavored confection but, in this and the fudge before it, it’s much lighter.

I don’t know that I’ll make this again. If I’m going to go to the time and effort to bake from scratch, the result should be fantastic, and this isn’t.

But buy the book: if not for the food, for the fun.

New Banana Cake

2-1/2 cups cake four, sifted
1-2/3 c. sugar
1-1/4 tsp. baking powder
1-1/4 tsp. baking soda
1 tsp salt
2/3 c. soft shortening
2/3 c. buttermilk
1-1/4 c. ripe bananas (about 3)
2 large eggs
2/3 c. chopped nuts

Preheat oven to 350-degrees.
Grease & flour 2 9-inch pans or one 13x9 pan (I use 9-inch pans and lined them with parchment). Sift together four, sugar, soda, and salt. Add shortening, buttermilk & half of the bananas, mix to combine. Add the eggs and rest of the bananas, mix to combine. Fold in nuts & pour into pans. Bake 30 – 45 minutes, depending upon pan size. (Mine were done in 30 minutes.)


Chocolate Butter Icing

3 c. confectioner’s sugar, sifted
1/3 c. butter, softened
3 Tbs. cream
1-1/2 tsp. vanilla
3 oz. unsweetened chocolate, melted

Blend sugar with butter. Add cream, melted chocolate and vanilla, stirring until smooth.


Grade: Cake, B-; Frosting, B


Tags: ,, , , , , ,

Monday, March 27, 2006

Peeps Season

So many Peeps, so few plans.

I can't imagine it's a coincidence that on the first day it actually feels like Spring, my annual Peeps obsession kicked in. I bought four 3-packs of the chicks today (no bunnies; I'm a purist) and now have to figure out what the hell I'm going to do with them.


I'm not going to eat them "raw" -- I don't buy them for their flavor. I buy them for their cheery colors and blank expression. Sure I'll eat some, but I don't think that's really the point.

Anyway, I want to find a recipe that incorporates the Peeps while using their aesthetics for maximum impact. The official website has several ways to decorate with them (including glue-gunning them to a hat) but I'm looking for something more (I don't need a
Peeps sombrero).

If you have a Peeps recipe suggestion, please send them here.

Remember: only you can help can help a Peep get out of its box and into a better life.

Well, before having its head bitten off.


Tags: , , , , , , ,

Sunday, March 26, 2006

Ah! Fudge


Ah! Fudge.

Sadie the stepdaughter sampling sweets.


Read the recipe here.

Two things about fudge: 1) it's notoriously difficult to make 2) I've never made it before. Recipe ... for disaster! (Cue musical sting.)

But this month's Martha Stewart Living, which calls like a culinary siren,
had a fudge recipe replete with "money shots": a pile of it on a cake plate, a feminine hand stirring the molten mixture, an assortment of add-ins positioned just so.

"If you can make it without it crystalizing," said Carolyn, the same Carolyn mentioned below, "I'll buy your recipe, pans, butter, mixer and anything else you use to make the damned stuff." Everyone she knew had given up on making "real fudge" (her words) in exchange for the Marshmallow Fluff fudge recipe.

A challenge. I could get fudge and cash out of this? Hey, I'm in.

The recipe I used was not the one in the magazine but one I'd found on the website (for a boring reason*). They're fairly similar (they both yeild fudge...): one has cream, the other butter; one uses chocolate and cocoa, the other, solely chocolate.

I took the opportunity to buy to some chocolate products I've been jonesing for: Scharffen Berger's 99% Cacao Unsweetened and Ghirardelli's Unsweetened Cocoa. They're not what you would call cheap (I paid $10 for under 10 oz. of Scharffen Berger) but if I was going to make fudge, I was going for the gold.

I've used Ghirardelli in the past and been happy with the results, but wasn't as sure about the S.B. Though it has a great reputation, I've also heard people say it's bitter. Nobody wants bitter fudge.

While prepping, I tasted an S.B. shaving -- much smoother than expected. The aroma is wonderful -- deep, rich, and alluring -- so much so that I took another taste. (On the other hand, after sampling the S.B., Sadie ran from the room shouting "Water! I need WATER! Waaaaaaaaaaaaterrrrrr!" So I guess the lesson here is that 7 year olds don't like unsweetened chocolate.) I won't be snacking on the 99% Cacao anytime soon, but it's a great baking chocolate choice.

This is a recipe in which I HAD to have mise en place -- not my usual M.O. (I'm a disorganized, messy cook). But no mise en place = crappy confection.

I won't say this recipe is hard, but it does require precision. (Well, sort of. More about that in a minute.) There's no way I could have made it without a candy thermometer and I watched it like a hawk.

I could have used a bit more information in the website recipe (the magazine's instructions were much clearer; I wish I'd read those as well before proceeding), especially when it came to the phrase "Brush down sides of saucepan with a pastry brush dipped in water to prevent crystallization." Um, when? Before or after the sugar has dissolved -- or both? How much water should I use? Can I ruin the fudge by over-brushing the sides of the pan?

So, I winged it (or, uh, "fudged" it). I kept the pastry brush in a mug of lukewarm water on my range, and violently shook it before wiping the down the sides of the pan (my dog got wet more than once). I probably did this every two minutes while at the stove.

After bringing the mixture to 236-degrees F (soft ball candy stage), I was supposed to pour it into a buttered metal bowl, dot it with small pieces of butter, and let it cool to 110 to 118-degrees F. But I forgot to dot it with butter (whoops). By the time I realized my mistake, the fudge had cooled to 118-degrees. Frantic, I tossed my chilled butter into the microwave for about 45 seconds, figuring I could approximate the effect the molten fudge would have had on the butter. After microwaving, I was left with a mix of melted and softened butter. (Incidentally, the recipe says to pour the hot fudge into a metal bowl, let it cool, and then scrape it into a mixing bowl. Since my Kitchen Aid stand mixer is fitted with a metal bowl, I cut out the middle man by buttering the mixing bowl and pouring the hot fudge directly into it.)

Another issue I had was the mixing time. The recipe says to "beat, stopping occasionally, until fudge keeps its shape when dropped from a spoon and sheen is gone, 3 to 8 minutes." There was no way my fudge was going to do that in 8 minutes. let alone 3. It took me at least 13 minutes to achieve that stage, all the while worrying that somehow, I was going to screw things up.

I did not. The fudge came out extremely well, though I'm chalking that up to beginner's luck. Sadie nearly exploded after tasting it (her first taste of fudge ever) and now she won't stop asking for it. (This was flattering for the first 10 minutes... I can't really blame her though; who doesn't crave chocolate, sugar, and butter?) It's lighter than I expected it to be; I imagine the milk and butter mitigated the cocoa and chocolate's darkness. It is very rich, as fudge should be, and extremely tempting.

Carolyn was impressed. She still hasn't paid me though, the welcher.

Next time, I'll throw in some nuts. I'd also like to try the Fluff fudge recipe and see how it measures up.

Grade: A (with nuts, I'm guessing A+)


*Here's why: efficiency. After I'd finished teaching Business Communications, I was going to pick the kids up from school, and head straight to the grocery store. Before doing that, however, I needed to find out what ingrediants I needed; I found this fudge recipe before I came across the one in this month's MSL. See? Boring.

Crock-pot Pulled Pork

Another Saturday, another dinner party! Last night, we had Carolyn (not the banana bread Carolyn; a different one) and her family (sans teenage daughter, whose band was invited to play in Disney World) over for what turned out to be a smorgasbord:

Pulled pork sandwiches, shells and cheese, homemade apple sauce, hand-picked and home-frozen corn (we thawed it before eating), sparkling grape juice, salad, icebox cake, coffee, fudge and sugar cookies (plus cheddar cheese, wheat crackers, pepperoni, and Asian-flavored rice snacks for hors devours).

Needless to say, my jeans are a bit tight today.

I love making pulled pork; it’s effortless and delicious. Plus, it fills the house with a wonderful smell while it’s cooking.

Crock-pot Pulled Pork

1 Pork Shoulder "Butt," preferably boneless*
1 19oz. bottle of Dinosaur Barbeque’s Sensuous Slathering Sauce,** plus another for serving

Rinse and pat the pork butt dry. Place a thin layer of BBQ sauce in the bottom of your crock-pot. Place the pork, fatty side up, into the crock-pot and slather with the rest of the BBQ sauce in the bottle. Cover and cook on low for 8-10 hours.

When finished, the meat will be extremely tender; a steak knife will easily poke through. To shred, cut chunks from the butt and pull apart with two forks. Serve with the liquid in the crock-pot (run the liquid through a fat separator) and additional BBQ sauce, if desired. It’s great on a bun, mixed with rice, or all by itself.

Grade: A

*aka, Boston Butt. Ask your butcher for help in determining a good serving size for your needs.

**or your favorite brand of BBQ sauce

Tags: , , , , , , ,

Friday, March 24, 2006

Busy & Doctored Brownies

It's been a pretty hectic week around here, which has precluded me from doing much blog-worthy cooking. We ate corned beef and cabbage leftovers, homemade chicken soup, some take out and tonight, we had an impromptu potluck with some good friends. We had a great time: five kids and five adults feasting on smoked pork chops, shrimp stir-fry, rice (brown, jasmine, AND broccoli-cheddar) and salad. Plus, we topped everything off with coffee, brownies and a slew of candy (sour blue raspberry gummy bottles, chocolate covered marshmallow eggs, rock candy, and gourmet chocolate mints).
We are very full, but comfortably so.

Once I've recovered from tonight's meal, I'll begin tackling my cooking agenda:

Crockpot Pulled Pork
Fudge
Chicken and dumplings
Pudding (flavor TBA)

In the meantime, here's my doctored brownie recipe, the result of which we scarfed down tonight.

Happiness on a napkin.


Doctored Brownies

1 family-size pkg. dark chocolate brownie mix (such as Duncan Hines Dark Chocolate Fudge)
1 tsp. vanilla
1 cup Ghirardeli Semi-sweet or 60% Cocoa Bittersweet Chocolate Chips
1 cup chopped walnuts or pecans (optional)

Line a 9x13 inch pan with aluminum foil. Prepare mix as directed for chewy brownies (not cake style), then add the vanilla, chocolate chips and nuts. Mix to combine. Pour batter into pan and bake according to the package directions.

Allow brownies to cool in pan before using the foil to lift them out. Use a bread knife or pizza wheel to cut into desired size. Enjoy with a tall glass of cold milk.

Grade: B+ to A, depending on ingredients

Sunday, March 19, 2006

Corned Beef, Cabbage & Potatoes

Photo-illustration courtesy of Google Image Search. I forgot to take a picture of our corned beef dinner before we ate it. Oops.

While St. Patrick's Day was this past Friday, we ate corned beef, cabbage, and potatoes today. (We had friends over for dinner on Friday who don't eat beef, so I baked up some fish and chips. Don't be impressed -- I bought them frozen at BJ's).

The thing I love about corned beef is that it's dead simple to make; it doesn't even merit an actual recipe.

Place your corned beef in a large pot and cover with cold water. Cover the pot with a lid and bring to a boil. Reduce heat to a simmer and cook corned beef until tender, about 50 minutes per pound. (My corned beef was 3.5 pounds, so I cooked it for about 3 hours.)

When your corned beef is tender, toss in some potatoes (I cut up red potatoes to speed up the cooking) and cook until almost tender. At this point, remove the corned beef and cover with foil, allowing it to rest for approximately 20 minutes.

With the potatoes, toss in a head of cabbage, chopped into thin wedges and cook until tender (I like it a bit crunchy).

When ready, drain the potatoes and cabbage and toss with butter. Serve with corned beef slices cut against the grain. You'll probably want to sprinkle the cabbage and potatoes with salt and pepper and eat the corned beef with a spicy mustard (like Gulden's -- save the wussy flavor of French's for another dish).


Grade: A+


UPDATE: A great way to reheat leftover corned beef is to simmer it in beer. As for the potatoes and cabbage, just pop them in the microwave. Dinner in a flash!

Monday, March 13, 2006

Q Cookies


There are recipes everyone loves, and there are recipes that loved by only a few. This may be the latter. You’ll have to judge for yourself.

My dad’s mother – my "Me-ma" – came over from Italy in the first half of the 20th century. She was a fabulous cook; Sunday dinners were always replete with spaghetti and meatballs, ravioli, sweet peppers in olive oil, and scores of other things I was too young to take in.

The problem with this was that when her family wanted her recipes, she couldn’t supply them. Me-ma did her cooking from memory, sight and taste: a little of this, a handful of that, more water, less flour. There weren’t precise measurements, there was just Italian culinary magic.

Which is why her children and grandchildren now get so excited when they are able to recreate one of her dishes. My father is the front-runner – he’s able to make her sauce, her holiday soup (known more commonly as “Italian Wedding Soup”), her zeppolis.

But no one had her “Q cookie” recipe. Q cookies are crunchy, dry, lightly sweetened biscuits Me-ma would make by the hundreds. Her house in Astoria, Queens always had a stock-pot-cum-cookie-jar filled with them. I ate scores of cookies, washing them down with large glasses of cold milk. (I’m told, incidentally, that I named these Q-cookies when I was very young. One of the shapes Me-ma made was a circle with small cuts in it, which would make parts of the dough flare out during baking. The tail on the letter “Q” spikes out similarly. )

I thought it was only to remain a memory until I took an Italian Cooking course at ICE where I made a Crostate di Mele alla Romana – sort of an apple tart. The crust, called a pasta frolla, was a dead ringer for Me-ma’s cookies.

I didn’t care for the Crostata, but I was thrilled to find the pasta frolla recipe. I adapted the recipe to bring it closer to Me-ma’s, and had my dad taste the results.

The recipe yielded about 30 3-inch cookies but what’s pictured above is all that’s left – they passed the test.


Q Cookies
3 cups all-purpose flour
¾ cup sugar
½ tsp. salt
1 tsp. baking powder
1 ½ sticks unsalted butter
3 large eggs, plus an additional egg for the egg wash

Mix together the dry ingredients in a food processor or stand mixer. Add the butter and pulse/mix until finely mixed in. Add the eggs and continue to pulse/mix until the dough forms a ball. Wrap and chill until ready to use. (I skipped this step and didn’t have a problem.)

Preheat oven to 350-degrees. Cover a cookie sheet with foil or parchment paper. On a clean, flat work surface, roll out the dough into desired shapes, making sure cookies are of a similar size and thickness. (This is a great project for kids – it’s a bit like working with Play-doh.) After placing on the cookie sheet, brush each cookie with the egg wash (a well-beaten egg mixed with a splash of water). Space the cookies about 1-inch apart.

Bake for approximately 10 minutes, and brush again with the egg wash. Bake until the cookies are golden brown, an additional 8 to 13 minutes.

Allow to cool and store in an airtight container. Enjoy with a large mug of coffee or a tall glass of milk. Dunking is encouraged.

Grade: A+, but I'm terribly biased.

Friday, March 10, 2006

Dog Biscuits

Apparently, all that fur makes him look slimmer. Maybe I should try that.


My husband and I just came back from taking Flurry, our American Eskimo dog, to the vet. I was quite worried about him as in the past month, he’s had two can’t-stop-running-seizure-like episodes, the second of which happened yesterday morning. They weren’t actually seizures – when we held him gently, he was able to voluntarily stop moving – but they were frightening.

Anyway, the vet thinks the problem is muscle spasms which are a) painful and b) scary for the dog, hence the uncoordinated running. The vet put Flurry on a diet, wrote a prescription for painkillers, and told us to increase his exercise.

I am so relieved that it isn’t anything too serious, I thought I’d celebrate by giving Flurry some extra petting and posting this dog biscuit recipe.

Don’t tell Flurry though; he has to lose weight.

Dog Biscuits
1-1/2 cups all purpose flour
1-1/2 cups whole wheat flour
½ cup cornmeal
2 Tbsp. dried milk
¼ tsp. garlic powder
1 egg, beaten
1 to 1-1/4 cups water or broth

Preheat oven to 250-degrees. Stir together dry ingredients, then add egg and water. If the dough is too wet or dry, add more flour or water, respectively.

Knead dough until smooth. Roll dough ¼-inch thick (preferably between two sheets of parchment paper) and cut with cookie cutters. Place cutouts slightly apart on a lightly greased cookie sheet (or lined with parchment) and bake 45 to 50 minutes or until lightly browned and slightly dry inside. Turn off oven and leave biscuits inside overnight. Store in an air-tight container.

Grade: I don't know -- I'm not a dog.

Tuesday, March 07, 2006

Spicy Banana Bread

In the pan and on the plate.


Spicy Banana Bread
2 cups flour
1 tsp. baking soda
1/2 tsp. salt
1/2 tsp. cinnamon
1/4 tsp. nutmeg
1/4 tsp. cloves
1/2 cup unsalted butter
1 cup sugar
2 eggs
1 cup mashed bananas
1/4 cup orange juice
1 cup chopped walnuts
1 tsp. vanilla

Preheat oven to 350-degrees. Grease and flour a 9x5x3 inch loaf pan. Soften butter to room temperature. Sift flour with baking soda, salt and spices. Cream butter and gradually add sugar, beating until the mixture is light and fluffy. Beat in eggs, one at a time. Add sifted dry ingredients alternately with mashed bananas and orange juice, stirring only to blend. Fold in nuts and vanilla. Pour batter into greased loaf pan and bake one hour. Let cool 30 mins. in pan.

---

When Carolyn, my oldest friend, told me she had a recipe for "Spicy Banana Bread," I thought it might be another example of fusion desserts. Like wasabi infused chocolate, or chipotle spiked ice cream, I expected a heavy dose of chili pepper.

Yeah...I was wrong.

This quick bread is spicy, but not in a pepper or mustard way. Cinnamon, nutmeg, and cloves are deepen the bread’s flavor, complementing the gentle sweetness of the banana and sugar. I'm a real spice fan, so next time I'll increase the amount of cinnamon, nutmeg and cloves and see how things turn out.

Carolyn also suggested using older bananas, and she’s absolutely right. Don’t make this banana bread, or any other, with those barely ripe bananas you get at the store. Wait until they’ve got lots of brown freckles on them – that’s when they’re sweetest. In fact, a banana that’s too brown to eat straight (simply from an aesthetic perspective) is perfect for banana bread. But if you’ve only got one too-brown banana, just toss it in the freezer. The peel will get very dark but the banana inside will be fine. When you’re ready to make bread, just pop the banana out of the deep freeze and thaw.

Making the batter was simple – smooth sailing all the way. Baking it up was a little different. I was worried my oven was still running too hot, so I took a peek after 45 minutes. The bread looked done but the toothpick test revealed a batter-y inside. Uh-oh. I reduced the temperature to 330-degrees and baked for another 10 minutes. No darker but a bit less wet. Then, I moved the temperature back to 350 and baked for another 16 minutes. Done! This time, the bread was cooked throughout and perfectly browned with a nice centered peak. (Plus, the house was filled with the spicy scent of baked goods.) Lesson learned: the oven’s thermostat has been recalibrated – no need to bake at a lower temp.

Very tasty, and the flavors seem to intensify as the bread cools. A great accompaniment to a well-brewed cup of tea. I can't wait to toast a slice and smear it with butter.

Grade: A


Tags:, , , , , ,

Monday, March 06, 2006

Guest Review: Chocolate Chip Macaroon Angel Food Cake

TIP: Cutting angel food with a regular knife will squash the cake. If you don't have an angel food cake comb (above) saw through it with unflavored dental floss.


This recipe comes from Creighton, the 12 year old daughter of two good friends. She has made this -- by herself -- on several occasions. In fact, it was the dessert of honor when her family joined ours for a chicken-and-rib dinner. She did a wonderful job (it's a delicious cake) but I'll leave the rating up to Creighton.

Cake*
1 1/2 cups powdered sugar
1 cup cake flour (OR 1 cup minus 2 TBS. all-purpose flour)
12 (about 1 1/2 cups) egg whites
1 1/2 tsp. cream of tartar
1 cup sugar
1 tsp. almond extract
1 tsp. vanilla
1/4 tsp. salt
1 miniatureture semi-sweet chocolate chips
1/2 cup sweetened flaked coconut

Topping
1 cup sweetened whipped cream
1 cup sweetened flaked coconut, toasted

Heat oven to 375-degrees. Stir together powdered sugar and cake flour in small bowl; set aside.

Beat egg whites and cream of tartar in large mixer bowl at medium speed until foamy (1 to 2 minutes). Beat at high speed, gradually adding sugar, 2 TBS. at a time. Continue beating, adding almond extract, vanilla, salt and scraping bowl often, until stiff and glossy (6 to 8 minutes).

Gradually stir flour mixture, 1/4 cup at a time, into egg mixture by hand just until flour mixture disappears. Gently stir in chocolate chips and 1/2 cup coconut.

Gently spoon batter into an ungreased 10-inch tube pan. Cut gently through batter with metal spatula. Bake for 30 to 35 minutes or until cracks feel dry and top springs back when touched lightly. Invert pan on heat-proof funnel or bottle; cool 90 minutes. Remove from pan. Decrumb cake with fingertips.

Place cake on serving plate. Pipe top and around bottom of cake with sweetened whipped cream; sprinkle with toasted coconut.

Creighton's Grade: A

*A 16 oz. angel food cake mix can be substituted for the homemade cake, although Creighton always makes her angel food from scratch.


Tags: , , , ,

Saturday, March 04, 2006

Hot Oven (Check it and see…)

This oven thermometer has been discontinued. Pity.

I finally got it through my thick skull that my oven has been running too hot. After burning one too many breads and cakes ("Just trim the edges; it’ll be fine") it finally dawned on me: "I bet the thermostat is out of whack."

From what I’ve read, this is a pretty common problem. Since my oven thermometer recently broke (well, OK -- a year ago), I reduced the heat by 15-degrees and baked a Pumpkin Pecan Quick Bread mix I had lying around (from William Sonoma) to test things out.

The bread baked up beautifully. Yay! Problem solved.

Later, I found
this article on oven temperature calibration and adjusted my oven. I think it worked but time will tell. I’ll keep you posted.


Tags: , , , ,

Raspberry Cream Cheese Breakfast Buns, Part II

Read Part I.


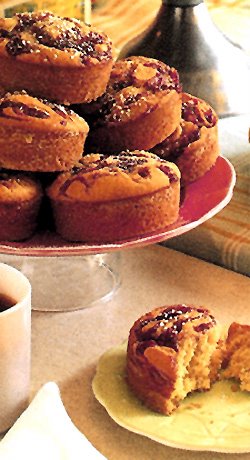
The Raspberry Cream Cheese Breakfast buns, both large and small. (They look like they're getting ready to face-off, don't they? "RUMBLE IN THE KITCHEN!")

I suspected that these “buns” would be more like muffins (that is, more cakey and less bready) and, as it turns out, I was right: they’re basically muffins. Delicious, tempting, wonderful muffins, and definately not buns.

The dough was much stickier than I expected, which made it difficult to A) place into lined muffin tins and B) swirl in raspberry preserves. (In a nutshell, it was a lot easier to make the dough than to prep it for baking.)

I doubled the recipe (below) and used standard muffin cups so instead of 9 buns, I got 24 with leftover batter (which I used to make 5 larger muffins). I also increased the vanilla and used Bonne Maman preserves, which I love. (I almost made them with a friend’s homemade strawberry jam, but I was in too much of a raspberry mood. Still, strawberry, blueberry, currant or even peach preserves would work well here. Just make sure they’re of good quality.)

Another issue I ran into: raspberry preserve overflow. At the last minute, I decided to double-line the muffin tins with paper liners – and I’m lucky I did. Several of the muffins would have been raspberry-glued to the pan but with the extra liner, I was able to lift the muffins out intact, leaving the outer liner stuck behind.

Next time, I’ll make larger muffins (unless doing a bake sale) because, just look at them -- they're gorgeous. I'll also use disposable foil muffin cups placed on a parchment lined baking sheet or disposable aluminum tray. Not only will they be easy to take out of the oven, but clean up will be a snap. I also might try placing a dollop of preserve in the middle of the muffin (place a bit of batter in the tin, top with preserve, and then top with more batter) instead of swirling.

Issues aside, this is a fabulous recipe. The muffin bottoms are delicate and tender, while the tops have a gentle crunch. The flavor is sweet (but not overly so) and comforting, with nice hits of butter, vanilla, and of course, raspberry.

According to the site, this is the Magnolia Bakery’s most popular breakfast item. After tasting them, it’s not a surprise -- they’re a must bake.

Raspberry Cream Cheese Breakfast Buns


1-3/4 c. all-purpose flour
1 tsp. baking powder
1/2 tsp. baking soda
1/4 tsp. salt
1 8oz. pkg. cream cheese, softened
1/2 c. (1 stick) unsalted butter, softened
1 c. sugar
2 large eggs, at room temperature
1/4 c. milk
1/2 tsp. vanilla extract
1/2 cup raspberry preserves
Confectioners’ sugar (if desired)

Preheat oven to 350-degrees. Grease and lightly flour (or use muffin liners) 12 standard muffin cups.

In a small bowl, combine the flour, baking powder, baking soda, and salt. Set aside.
On the medium speed of an electric mixer, beat together the cream cheese, butter, and sugar until smooth in a large bowl, about 3 minutes.

Add the eggs and beat well. Add the dry ingredients in two parts, alternating with the milk and vanilla.

Spoon the batter into the muffin cups, filling them about two-thirds full. Drop 3 small dollops (about a teaspoonful each) of raspberry preserves onto the top of each bun and, using the tip of a sharp knife, swirl the preserves into the batter, forming a decorative pattern. Bake for 25–30 minutes, or until a cake tester inserted in the center of the bun comes out clean.

Allow the buns to cool for about 30 minutes before dusting with confectioners’ sugar and serving.

Grade: A+

UPDATE: the Raspberry Cream Cheese muffins sold out first at the fundraiser. Whee!!!
Overall, the bake sale raised $170.04 to benefit Happy Tails.


Tags: , , , , , ,

Friday, March 03, 2006

Arborio Rice Chicken Soup with Escarole

There's a brightness to this soup from the last minute addition of lemon juice. It's a great late winter meal, when spring feels like its right around the corner. Pair it with a crusty bread and a good white wine.

Arborio Rice Chicken Soup with Escarole

2 TBS Butter
1 cup carrots, diced
1 cup celery, diced
1 cup onion, diced
1 tsp salt
6 cups chicken stock
1/3 cup Arborio Rice
2 cups escarole, chopped
Juice of one lemon
3/4 cup grated parmesan

In a large soup pot, heat the butter over medium heat. When hot but not brown, add the carrots, celery and onion & stir to coat with the butter. Reduce heat to low, cover the pot & sweat the veggies until they start to soften, about 8 minutes.

Add the salt and stock and bring to a boil. Stir in the rice. Allow the stock to return to a boil, stirring frequently. Cover the post and cook until the rice is done, 10 to 15 minutes.

Just before serving, stir in escarole & lemon juice. Adjust the seasoning. Transfer to warm bowls, sprinkle with parmesan & serve.

Grade: A

Lace Cookies


With and without chocolate.

Everyone loves these cookies; make them and people will genuflect before you. They bake up very thin and crisp but after a day or so, they soften up and become chewy (which is how I prefer them). They have very little flour in them but lots of butter and sugar, which is why they spread so much.

You can serve them as is, use them to garnish other desserts (so lovely and elegant placed in a scoop of ice cream) or use them (as I do) to sandwich melted chocolate between them. Ohhh, delicious.

Lace Cookies
1-1/2 cups uncooked regular oatmeal
1-1/2 cups light brown sugar
2 TBS. flour
1/2 tsp. salt
2/3 cup melted butter
1 egg, lightly beaten
1/2 tsp. vanilla

Preheat oven to 350-degrees and line baking sheets with parchment paper. Mix the oatmeal, sugar, flour, and salt in a bowl. Stir in the melted butter, then add the egg and vanilla and mix well. Arrange the batter by half-teaspoonfuls on the sheet, about 2 inches apart on the baking sheets. Bake until lightly browned, about 5 minutes. Cool slightly and remove the cookies with a spatula as soon as they are firm. (If they become to hard, pop them back in the oven for a moment to soften –- but my kitchen if icy and I've never run into this problem, so you probably won’t have to worry about it.)
Yields about 60 cookies. Once the cookies cool, place them gently in an airtight container or continue to the next step.

Chocolate Filling
1 bag of semi-sweet chocolate chips (I prefer Ghirardelli)

Place chips into a microwave-safe ziplock bag. Microwave for approximately 1 minute on 40-percent power, and “smush” the chocolate with your hands. Continue microwaving the chocolate for 30 second intervals at 30-percent power until melted, smushing between turns.

Once your chocolate has melted, snip a small corner off the ziplock to create a homemade pastry bag. Place a small dollop of chocolate in the center of a lace cookie (flat side up) and delicately top with another cookie (flat side down against the chocolate). Press the cookies together gently so the chocolate spreads evenly. Rest to dry on a cooling rack.

If you have leftover chocolate after filling the cookies (you probably will) squeeze the chocolate into another ziplock bag. Line your cookies up on your cooling rack, placing paper beneath the rack to catch extra chocolate. Make a tiny snip in the ziplock bag’s corner so that when squeezed, you’ll get a thin ribbon of chocolate. Working quickly, squeeze the chocolate over the cookies on a diagonal from left to right. Your cookies should have little chocolate stripes. Repeat the technique, this time moving from right to left. Now your cookies should have a diamond pattern on them. Don’t worry about being perfect; they’ll look beautiful. (If you’re feeling ambitious, melt white chocolate and drizzle on the cookies for a nice contrast.) Once dry, store in an airtight container.

Grade: A+


Tags: , , , ,

Raspberry Cream Cheese Breakfast Buns, Part I


Continuing with the Magnolia Bakery kick, I'm going to make these this weekend for a breakfast fundraiser. They look pretty damn good. I'll let you know how they turn out (and how much money they raise).

Read the recipe and results in Part II.

Tags: , , , ,