
VOTE! VOTE! VOTE!
Game ON! Vote for my Finger Lakes Fantastic Onion Burger (and four sides) by clicking here, or send an email to Rebecca@VisitFingerLakes.com with "FLX Ultimate Burger Vote: Laura Kenyon" in the subject line.
Thank you for your support and enjoy the recipes!
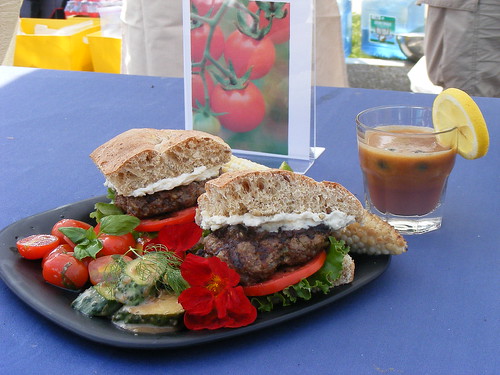
Finger Lakes Fantastic Onion Burger
Olive oil
2- 3 garlic cloves, minced (Mullala Garlic)
1 medium onion, diced ( Jones Brook Produce)
Round wholegrain loaf (Kitchen Blessings)
1 lb ground beef from Bedient farms
Salt and pepper
sliced tomatoes (Seneca Vegetables)
Baby arugula or salad greens (Ambrosia Acres Family Farm)
Franjo farms Onion Garlic Asiago spread
nasturtium flowers for plate garnish, optional (Ambrosia Acres Family Farm)
In a small sauté pan, heat olive oil over medium heat. Add onion and garlic and sauté until translucent; set aside and allow to cool to room temp.
Slice bread into four wedges, then slice horizontally to form buns; set aside.
Mix garlic and onion with ground beef; season with salt and pepper. Form four triangular patties (they should be similar in shape to the buns) about ¼-inch thick. Grill over medium-high heat, flipping once, to desired doneness.
While burgers are cooking, lightly brush the insides of the bun with olive oil, and place face-down on grill to toast.
When burgers are ready, place arugula or salad greens and tomato on bottom half of bun. Top with burger, then top with other half of the bun spread generously with Onion Garlic Asiago spread. Garnish plate with nasturtium, if desired.
Quick Pickles
1 pint of pickling cucumbers (Gale-Wyn Farm)
1 bottle of Roasted Garlic/Red Wine Balsamic Vinaigrette (Chef Lerman)
Sprigs of fresh dill (Firefly Farm)
Wash cucumbers and cut on a diagonal into ¼-inch slices; set aside. Heat vinaigrette in a small saucepan over medium heat until it simmers. Add cucumbers, let simmer for a minute and remove from heat. Allow cucumbers to cool until slightly warm; add sprigs of dill and stir to mix. Cool to room temperature or chill before serving.
Height of Summer Tomato and Basil salad
1 pint of grape tomatoes, halved (Gale-Wyn Farms)
Fresh basil cut in a chiffonade (Seneca Vegetables)
Maple Lemon-Lime Basil Vinaigrette (Canadice Kitchens/Sugarbush Hollow)
Salt and pepper to taste
Toss tomatoes, basil, vinaigrette (start with a couple of tablespoons and add more if desired), salt and pepper.
Lime-kissed Fire Roasted Corn
Unshucked ears of corn (Jones Brook Produce)
Lime wedges
Salt and pepper
Heat grill to medium high. Peel back the corn husks, being careful not to remove them completely, and remove the corn silk. Pull the husks back up over the corn so the ear is covered by the husk. If necessary, tie a spare piece of husk around the end of the corn to keep the husk closed.
Place the corn in their husks on the hot grill; cover. Turn the corn occasionally, until the husks are charred on all sides, about 15 to 20 minutes.
Remove corn from grill and allow to sit for 5 minutes. Remove the husks from the corn, and rub the ears with lime wedges. Season with salt and pepper.
Market Fresh Peach Blueberry Lemonade
8 ripe peaches, washed and pitted
2 pints of blueberries, picked over and rinsed
1 whole lemon, rinsed
Honey, to taste
Combine peaches, blueberries, and lemon in a juicer and process. Taste, and adjust sweetness by adding honey if needed. Garnish with a lemon wedge and extra berries.


 The recipe comes from the Illustrated Good Housekeeping Encyclopedic Cookbook, 1965, Vol. 3.

 Having recently been to Russia, I can definitively say the Moscow Mule is vast improvement over the traditional Russian summertime drink,
  She writes, "You can actually taste the vegetables now that your taste buds aren’t doing the backstroke in butterfat."


